主要流程
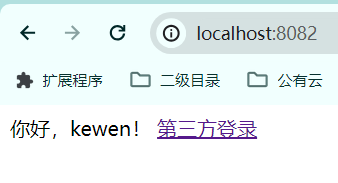
- 客户端前端页面点击授权,访问授权服务器的授权接口
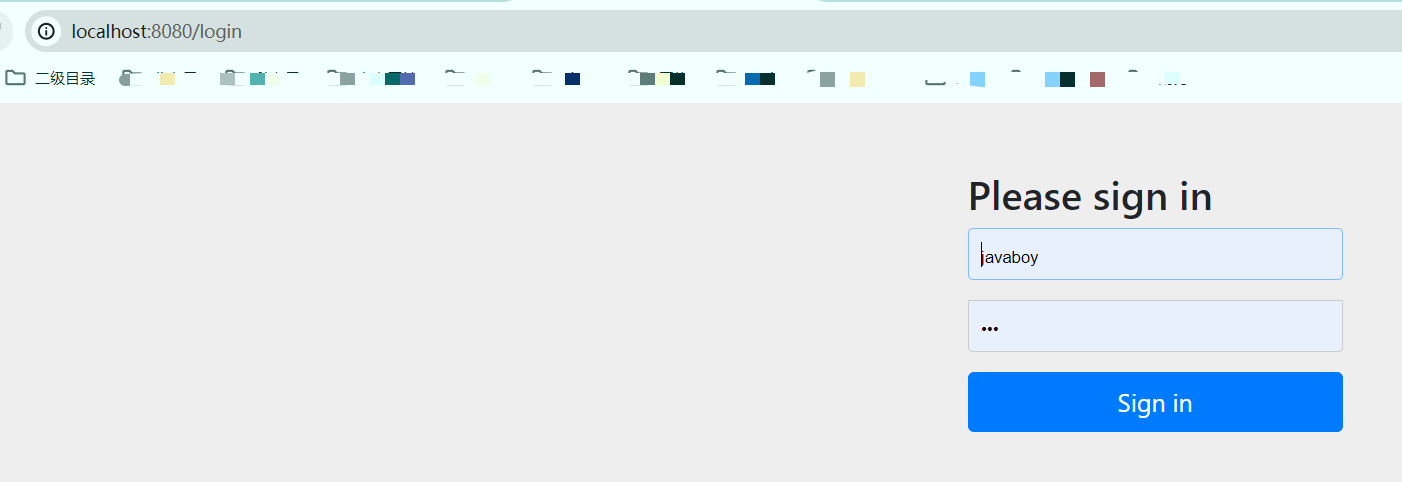
- 跳转到用户登录页,用户登录并授权

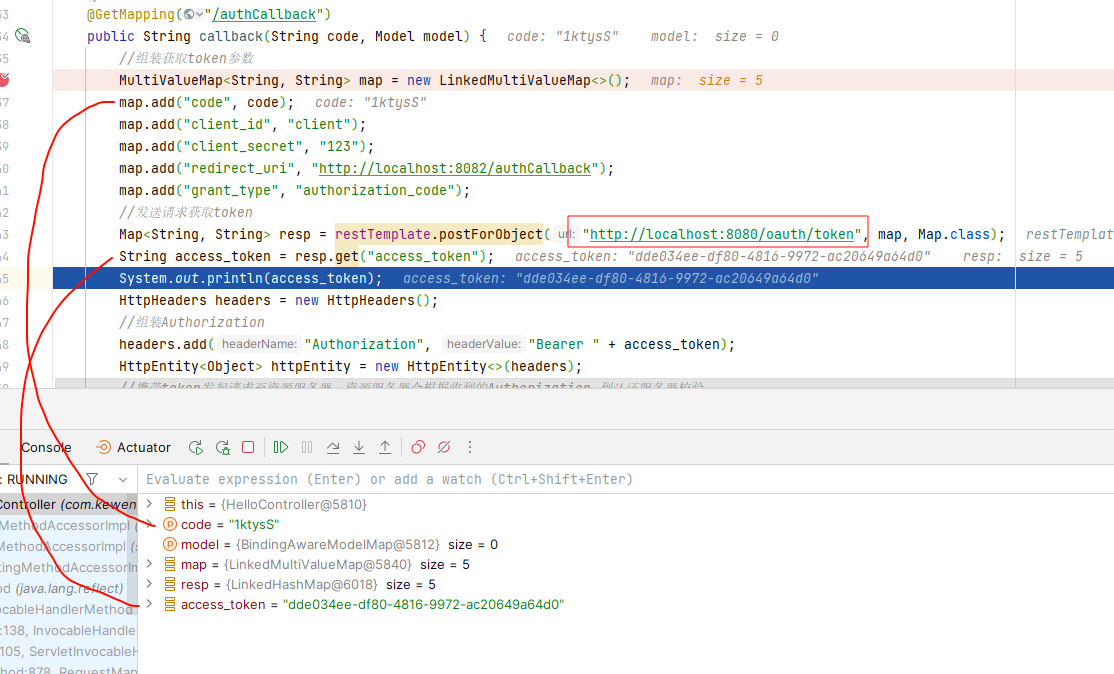
- 返回code并重定向到指定的客户端链接地址(客户端获取token的接口)
http://localhost:8080/oauth/authorize?client_id=client&response_type=code&scope=all&redirect_uri=http://localhost:8082/authCallback中的redirect_uri=http://localhost:8082/authCallback,并携带code
- 用code访问授权服务器获取token地址,返回token
这里在正式应用里面应该是将token保存起来复用,并设定定时刷新
- 访问资源服务器,这里访问的时候调用资源服务器接口,返回后继续执行后面的
- 资源服务器访问授权服务器校验token并获取用户信息
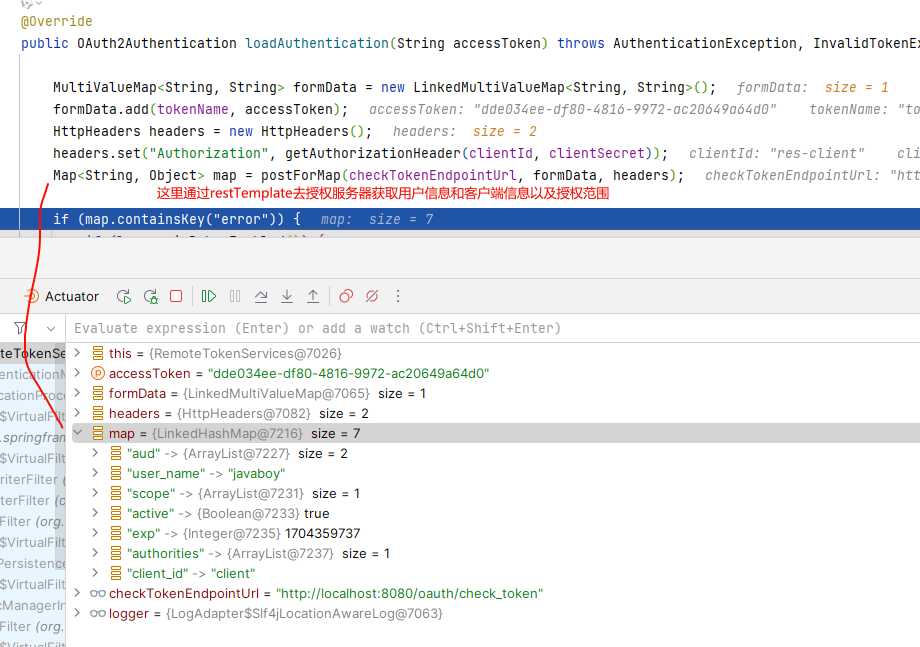
通过以上可以认证客户端和用户了,也就可以执行资源的获取,这里scope可以是一个列表,具体看请求的scope和授权的scope
- 资源服务器确认、处理业务并返回资源
入门案例
本文所有使用的依赖版本为
1
2
3
4
5
6
7
8
9
10
11
12
13
14
15
|
<dependency>
<groupId>org.springframework.boot</groupId>
<artifactId>spring-boot-dependencies</artifactId>
<version>2.3.2.RELEASE</version>
<type>pom</type>
<scope>import</scope>
</dependency>
<dependency>
<groupId>org.springframework.cloud</groupId>
<artifactId>spring-cloud-dependencies</artifactId>
<version>Hoxton.SR9</version>
<type>pom</type>
<scope>import</scope>
</dependency>
|
授权服务器搭建及配置
授权服务器搭建在springsecurity的基础上
引入依赖
oauth2依赖,security依赖
1
2
3
4
5
6
7
8
9
10
11
12
13
14
| <dependencies>
<dependency>
<groupId>org.springframework.cloud</groupId>
<artifactId>spring-cloud-starter-oauth2</artifactId>
</dependency>
<dependency>
<groupId>org.springframework.cloud</groupId>
<artifactId>spring-cloud-starter-security</artifactId>
</dependency>
<dependency>
<groupId>org.springframework.boot</groupId>
<artifactId>spring-boot-starter-web</artifactId>
</dependency>
</dependencies>
|
用户配置SecurityConfig
用户配置主要遵循spring-security基本的一套用户认证;所有配置 与spring-security相同
1
2
3
4
5
6
7
8
9
10
11
12
13
14
15
16
17
18
19
20
21
22
23
24
25
26
27
28
29
30
31
32
33
34
35
36
| @Configuration
@Order(1)
public class SecurityConfig extends WebSecurityConfigurerAdapter {
@Override
public void configure(WebSecurity web) throws Exception {
web.ignoring().antMatchers("/login.html", "/css/**", "/js/**", "/images/**");
}
@Override
protected void configure(AuthenticationManagerBuilder auth) throws Exception {
auth.inMemoryAuthentication()
.withUser("sang")
.password(new BCryptPasswordEncoder().encode("123"))
.roles("admin")
.authorities("s1","s2")
.and()
.withUser("javaboy")
.password(new BCryptPasswordEncoder().encode("123"))
.roles("user");
}
@Override
protected void configure(HttpSecurity http) throws Exception {
http
.requestMatchers().antMatchers("/login").antMatchers("/oauth/authorize")
.and()
.authorizeRequests().anyRequest().authenticated().and()
.formLogin().and()
.csrf().disable();
}
}
|
客户端授权配置AuthenticationServer
客户端授权配置主要配置令牌的安全约束、令牌生成的保存、客户端信息
1
2
3
4
5
6
7
8
9
10
11
12
13
14
15
16
17
18
19
20
21
22
23
24
25
26
27
28
29
30
31
32
33
34
35
36
37
38
39
40
41
42
43
44
45
46
47
48
49
50
51
52
53
54
55
56
57
58
59
60
61
62
63
64
65
66
67
68
69
70
71
72
73
74
75
76
77
78
79
80
81
82
83
84
85
86
87
88
89
90
91
92
93
94
95
96
97
98
99
100
101
102
103
104
105
106
107
108
109
110
111
112
113
114
115
116
117
118
|
@EnableAuthorizationServer
@EnableResourceServer
@Configuration
public class AuthenticationServer implements AuthorizationServerConfigurer {
@Bean
public PasswordEncoder passwordEncoder(){
return new BCryptPasswordEncoder();
}
@Override
public void configure(AuthorizationServerSecurityConfigurer security) throws Exception {
security.checkTokenAccess("permitAll()")
.allowFormAuthenticationForClients();
}
@Override
public void configure(ClientDetailsServiceConfigurer clients) throws Exception {
clients.inMemory()
.withClient("client")
.secret(passwordEncoder().encode("123"))
.resourceIds("res1", "res2")
.authorizedGrantTypes("authorization_code", "refresh_token")
.scopes("all")
.redirectUris("http://localhost:8082/authCallback")
.and()
.withClient("res-client")
.secret(passwordEncoder().encode("456"))
.and()
.withClient("client1")
.secret(passwordEncoder().encode("secret1"))
.autoApprove(true)
.authorizedGrantTypes("authorization_code", "refresh_token")
.scopes("all")
.redirectUris("http://localhost:8001/login")
.and()
.withClient("client2")
.secret(passwordEncoder().encode("secret2"))
.autoApprove(true)
.authorizedGrantTypes("authorization_code", "refresh_token")
.scopes("all")
.redirectUris("http://localhost:8002/login")
;
}
@Override
public void configure(AuthorizationServerEndpointsConfigurer endpoints) throws Exception {
endpoints
.authorizationCodeServices(authorizationCodeServices())
.tokenServices(authorizationServerTokenServices());
}
@Bean
AuthorizationCodeServices authorizationCodeServices() {
return new InMemoryAuthorizationCodeServices();
}
@Autowired
ClientDetailsService clientDetailsService;
@Bean
public AuthorizationServerTokenServices authorizationServerTokenServices() {
DefaultTokenServices tokenServices = new DefaultTokenServices();
tokenServices.setClientDetailsService(clientDetailsService);
tokenServices.setSupportRefreshToken(true);
tokenServices.setTokenStore(tokenStore());
tokenServices.setAccessTokenValiditySeconds(2 * 60 * 60);
tokenServices.setRefreshTokenValiditySeconds(3 * 24 * 60 * 60);
return tokenServices;
}
@Bean
public TokenStore tokenStore() {
InMemoryTokenStore tokenStore = new InMemoryTokenStore();
System.out.println(tokenStore.getAccessTokenCount());
return tokenStore;
}
}
|
资源服务器
依赖
资源服务器和授权服务器使用相同的依赖,只有使用的启动注解和配置不一样
1
2
3
4
5
6
7
8
9
10
11
12
13
14
| <dependencies>
<dependency>
<groupId>org.springframework.cloud</groupId>
<artifactId>spring-cloud-starter-oauth2</artifactId>
</dependency>
<dependency>
<groupId>org.springframework.cloud</groupId>
<artifactId>spring-cloud-starter-security</artifactId>
</dependency>
<dependency>
<groupId>org.springframework.boot</groupId>
<artifactId>spring-boot-starter-web</artifactId>
</dependency>
</dependencies>
|
配置
需要开启@EnableResourceServer
1
2
3
4
5
6
7
8
9
10
11
12
13
14
15
16
17
18
19
20
21
22
23
24
25
26
27
28
29
30
31
32
33
34
35
36
|
@Configuration
@EnableResourceServer
public class ResourceConfig extends ResourceServerConfigurerAdapter {
@Bean
RemoteTokenServices remoteTokenServices(){
RemoteTokenServices tokenServices = new RemoteTokenServices();
tokenServices.setCheckTokenEndpointUrl("http://localhost:8080/oauth/check_token");
tokenServices.setClientId("res-client");
tokenServices.setClientSecret("456");
return tokenServices;
}
@Override
public void configure(ResourceServerSecurityConfigurer resources) throws Exception {
resources.resourceId("res1")
.tokenServices(remoteTokenServices())
;
}
@Override
public void configure(HttpSecurity http) throws Exception {
http.authorizeRequests().antMatchers("/admin/**").hasRole("admin")
.anyRequest().authenticated();
}
}
|
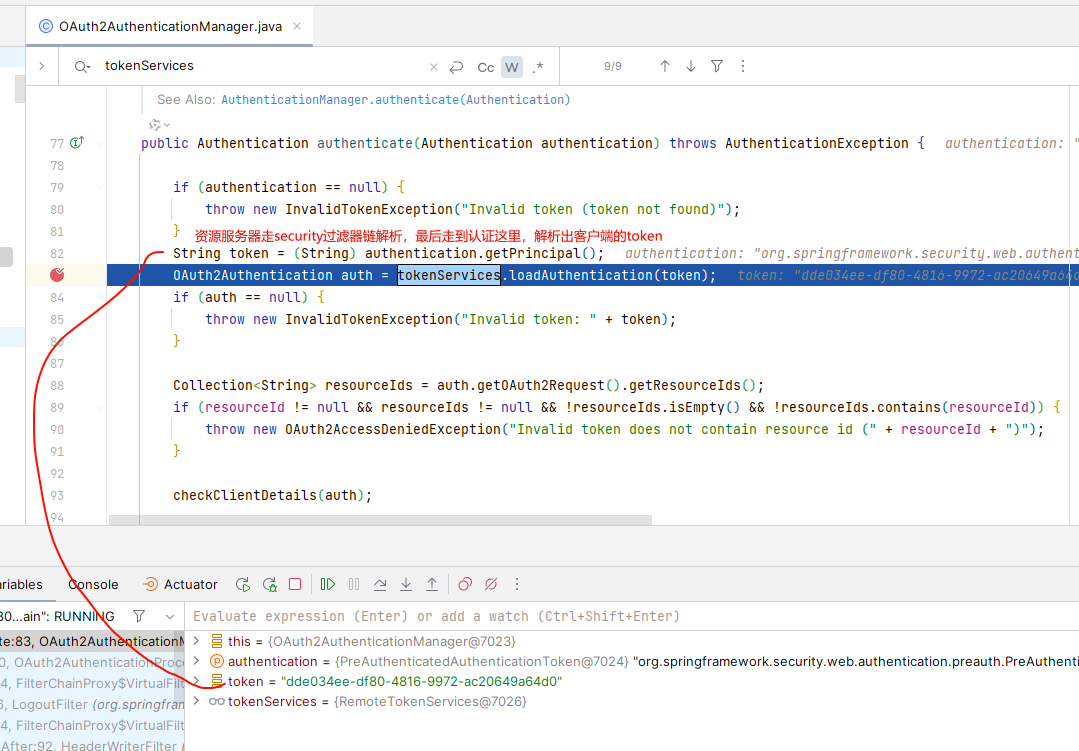
资源服务器不再需要用户认证,因为客户端带来了token,资源服务器的token的认证就相当于替换了资源服务器本身的认证过程
客户端
客户端不需要有spring-security相关的东西,只需要普通的客户端,用来模拟访问授权服务器和资源服务器即可
依赖
1
2
3
4
5
6
7
8
9
10
| <dependencies>
<dependency>
<groupId>org.springframework.boot</groupId>
<artifactId>spring-boot-starter-web</artifactId>
</dependency>
<dependency>
<groupId>org.springframework.boot</groupId>
<artifactId>spring-boot-starter-thymeleaf</artifactId>
</dependency>
</dependencies>
|
客户端后台
1
2
3
4
5
6
7
8
9
10
11
12
13
14
15
16
17
18
19
20
21
22
23
24
25
26
27
28
29
30
31
32
33
34
35
36
37
38
39
40
41
42
43
44
45
46
47
48
49
50
51
52
53
| @Configuration
public class ClientConfig {
@Bean
public RestTemplate restTemplate(){
RestTemplate restTemplate = new RestTemplate();
return restTemplate;
}
}
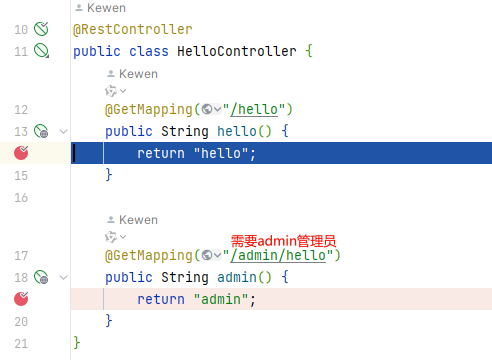
@Controller
public class HelloController {
@Autowired
private RestTemplate restTemplate;
@GetMapping("/index.html")
public String hello() {
return "index";
}
@GetMapping("/authCallback")
public String callback(String code, Model model) {
MultiValueMap<String, String> map = new LinkedMultiValueMap<>();
map.add("code", code);
map.add("client_id", "client");
map.add("client_secret", "123");
map.add("redirect_uri", "http://localhost:8082/authCallback");
map.add("grant_type", "authorization_code");
Map<String, String> resp = restTemplate.postForObject("http://localhost:8080/oauth/token", map, Map.class);
String access_token = resp.get("access_token");
System.out.println(access_token);
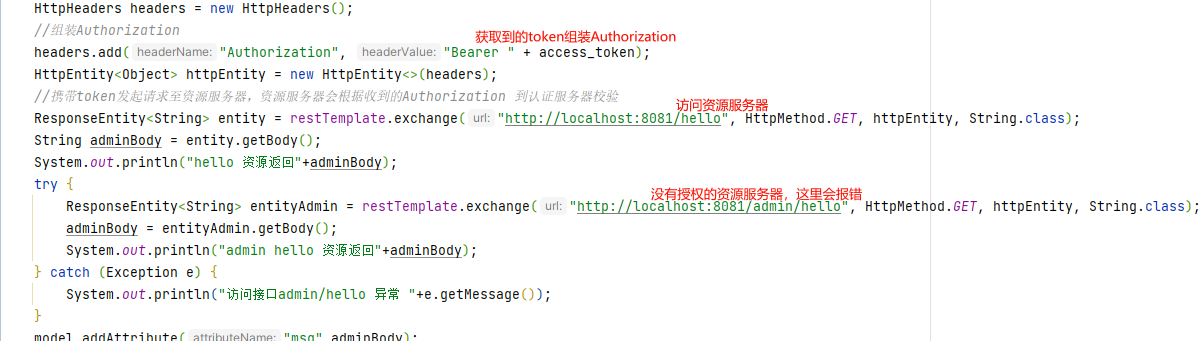
HttpHeaders headers = new HttpHeaders();
headers.add("Authorization", "Bearer " + access_token);
HttpEntity<Object> httpEntity = new HttpEntity<>(headers);
ResponseEntity<String> entity = restTemplate.exchange("http://localhost:8081/hello", HttpMethod.GET, httpEntity, String.class);
String adminBody = entity.getBody();
System.out.println("hello 资源返回"+adminBody);
try {
ResponseEntity<String> entityAdmin = restTemplate.exchange("http://localhost:8081/admin/hello", HttpMethod.GET, httpEntity, String.class);
adminBody = entityAdmin.getBody();
System.out.println("admin hello 资源返回"+adminBody);
} catch (Exception e) {
System.out.println("访问接口admin/hello 异常 "+e.getMessage());
}
model.addAttribute("msg",adminBody);
return "index";
}
}
|
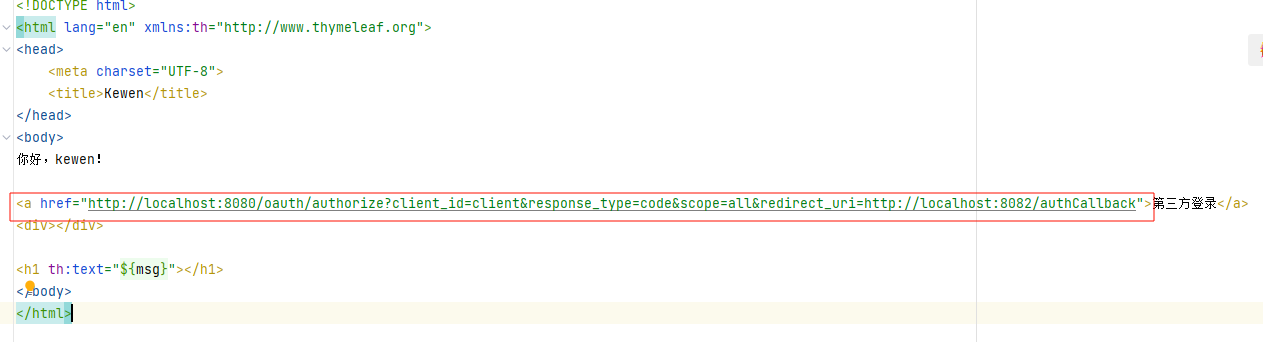
客户端页面
1
2
3
4
5
6
7
8
9
10
11
12
13
14
15
| <!DOCTYPE html>
<html lang="en" xmlns:th="http://www.thymeleaf.org">
<head>
<meta charset="UTF-8">
<title>Kewen</title>
</head>
<body>
你好,kewen!
<a href="http://localhost:8080/oauth/authorize?client_id=client&response_type=code&scope=all&redirect_uri=http://localhost:8082/authCallback">第三方登录</a>
<div></div>
<h1 th:text="${msg}"></h1>
</body>
</html>
|