1. 整体流程分析 前面我们已经得知一个单点登录的流程需要以下步骤
客户端1正常访问业务,由于没有登录,因此重定向 到登录接口
浏览器请求登录。login中通过@EnableSso创建的spring-security过滤器链拦截登录请求,重定向 到授权服务器获取授权码
授权服务器重定向 至登录界面,登录完成后重定向 到授权码接口继续授权
授权服务器授权完成后重定向 到客户端1登录接口
客户端1携带授权码code再次访问/login接口,这次有了code,则不再请求授权码而是请求token
授权服务器校验code并返回token
客户端1拿到token后调用获取用户信息的端点接口请求用户信息
完成登录
最后重定向 请求业务接口
其中,第2步,第3步,第6步,第7步是需要服务端参与的。
被重定向的浏览器请求获取授权码接口/oauth/authorize(第2步),然后重定向到登录
登录/login(第3步)
重定向到授权码接口/oauth/authorize(第3步),然后重定向到客户端
客户端直接调用服务端接口请求token/oauth/token(第5步),然后服务端返回token(此步骤非重定向)
客户端携带token请求服务端接口获取用户信息自定义接口(第7步)
我们还是应该先分析了客户端再分析服务端,客户端相对而言简单一些。
2. 源码解析 弄清楚了调用的接口,那么接下来就是分析源码了。
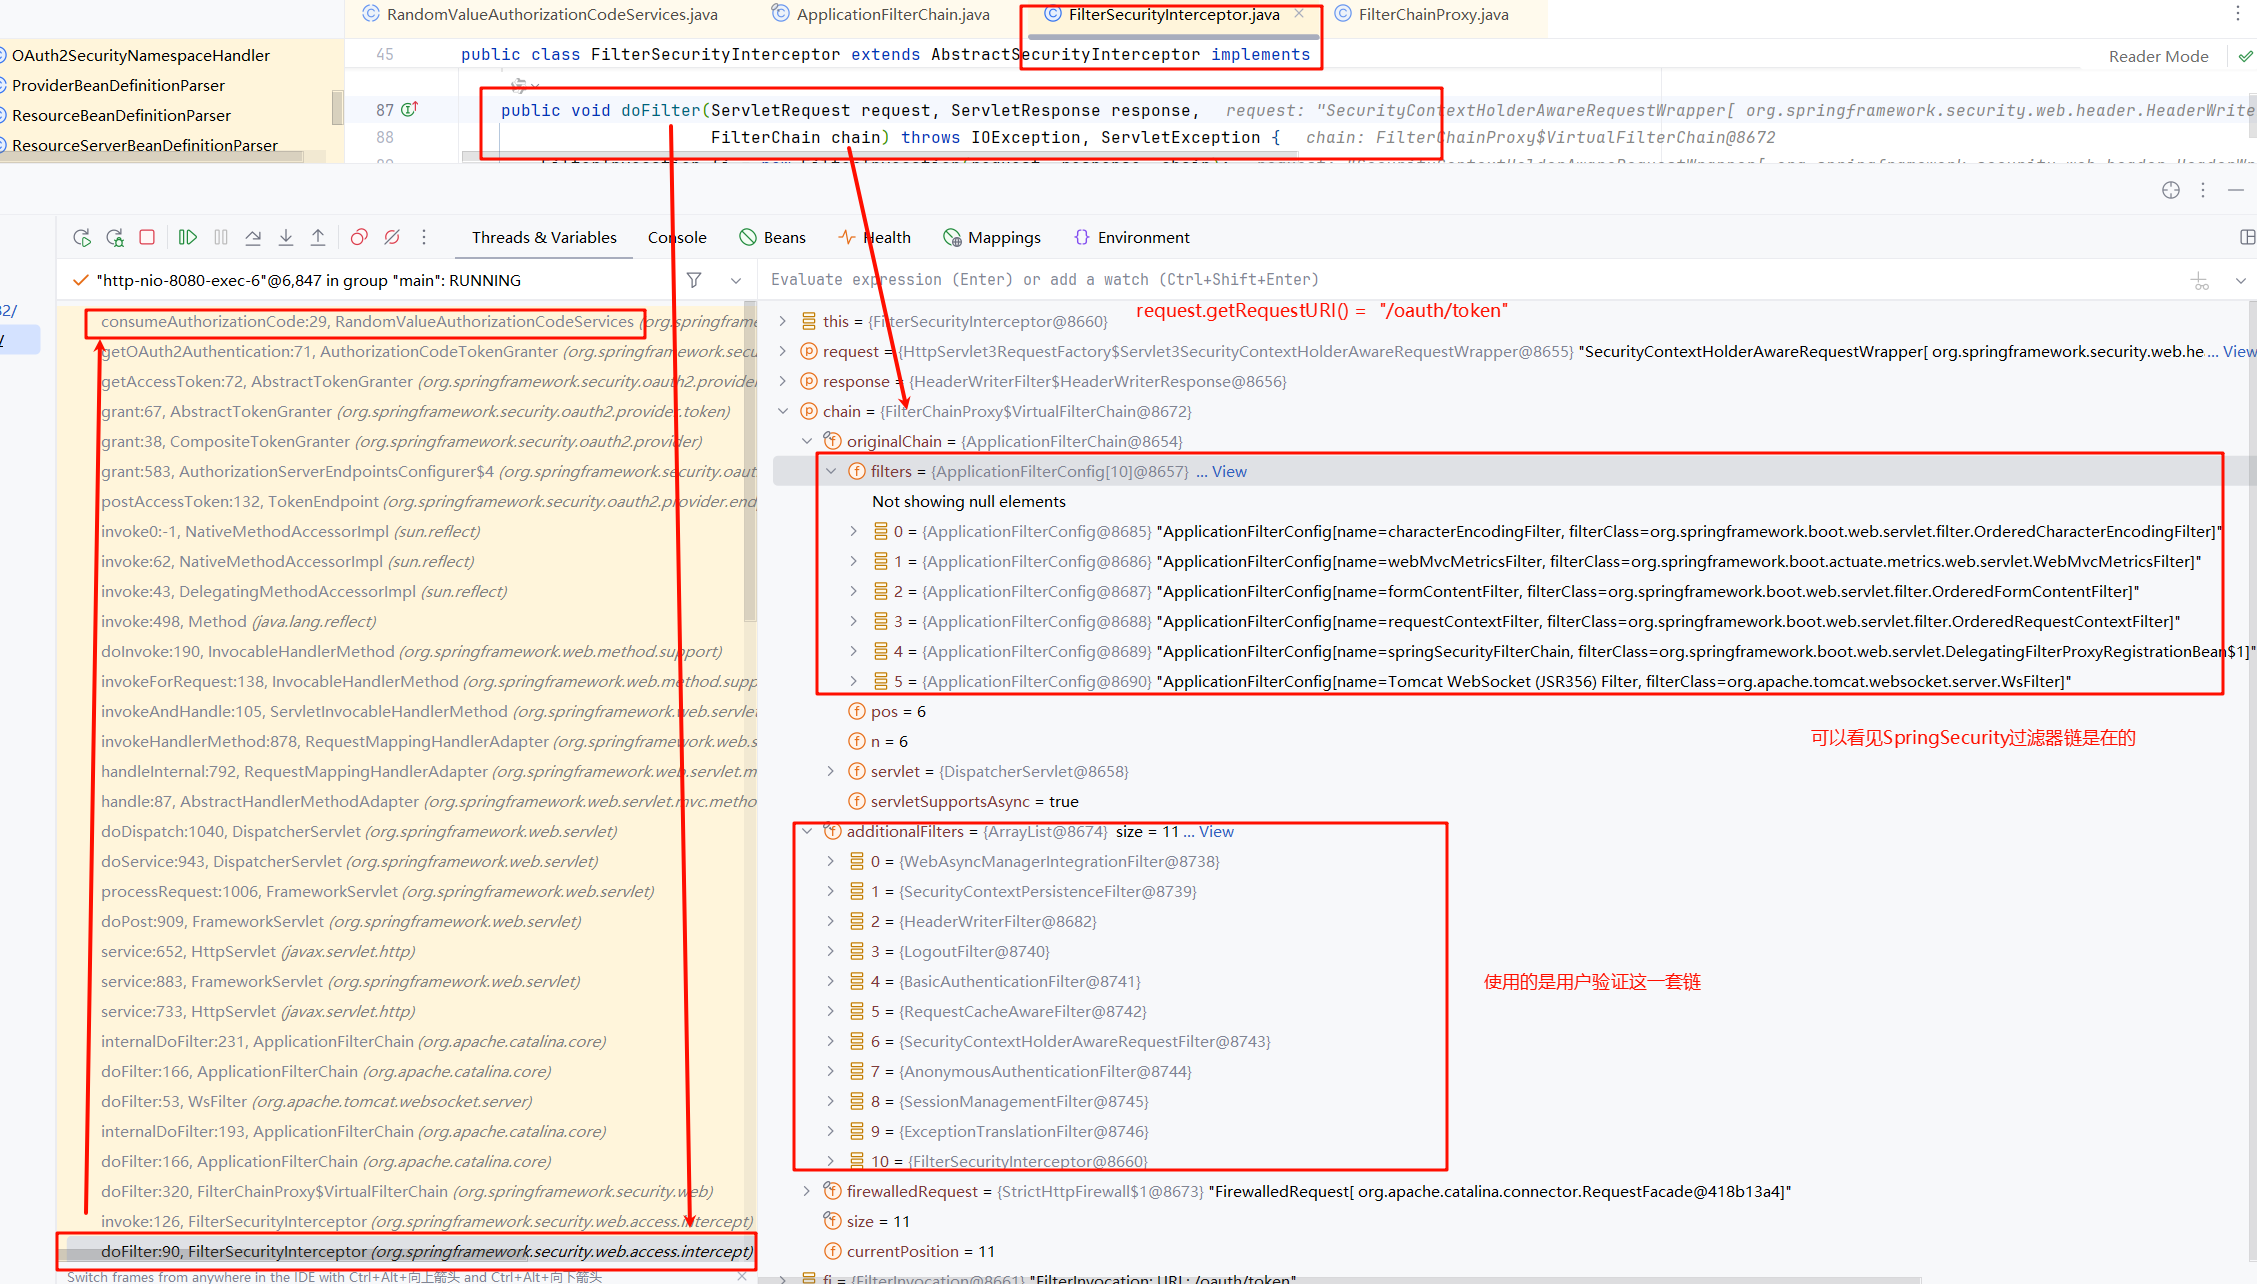
SpringSecurity的过滤器链相关的分析见 SpringSecurity过滤器链源码法分析 章节,总的来说就是有多个过滤器链,根据请求url选择不同的链执行。
Debug执行如下图:
additionalFilters已经是选择好了过滤器链之后登录这一条链了)
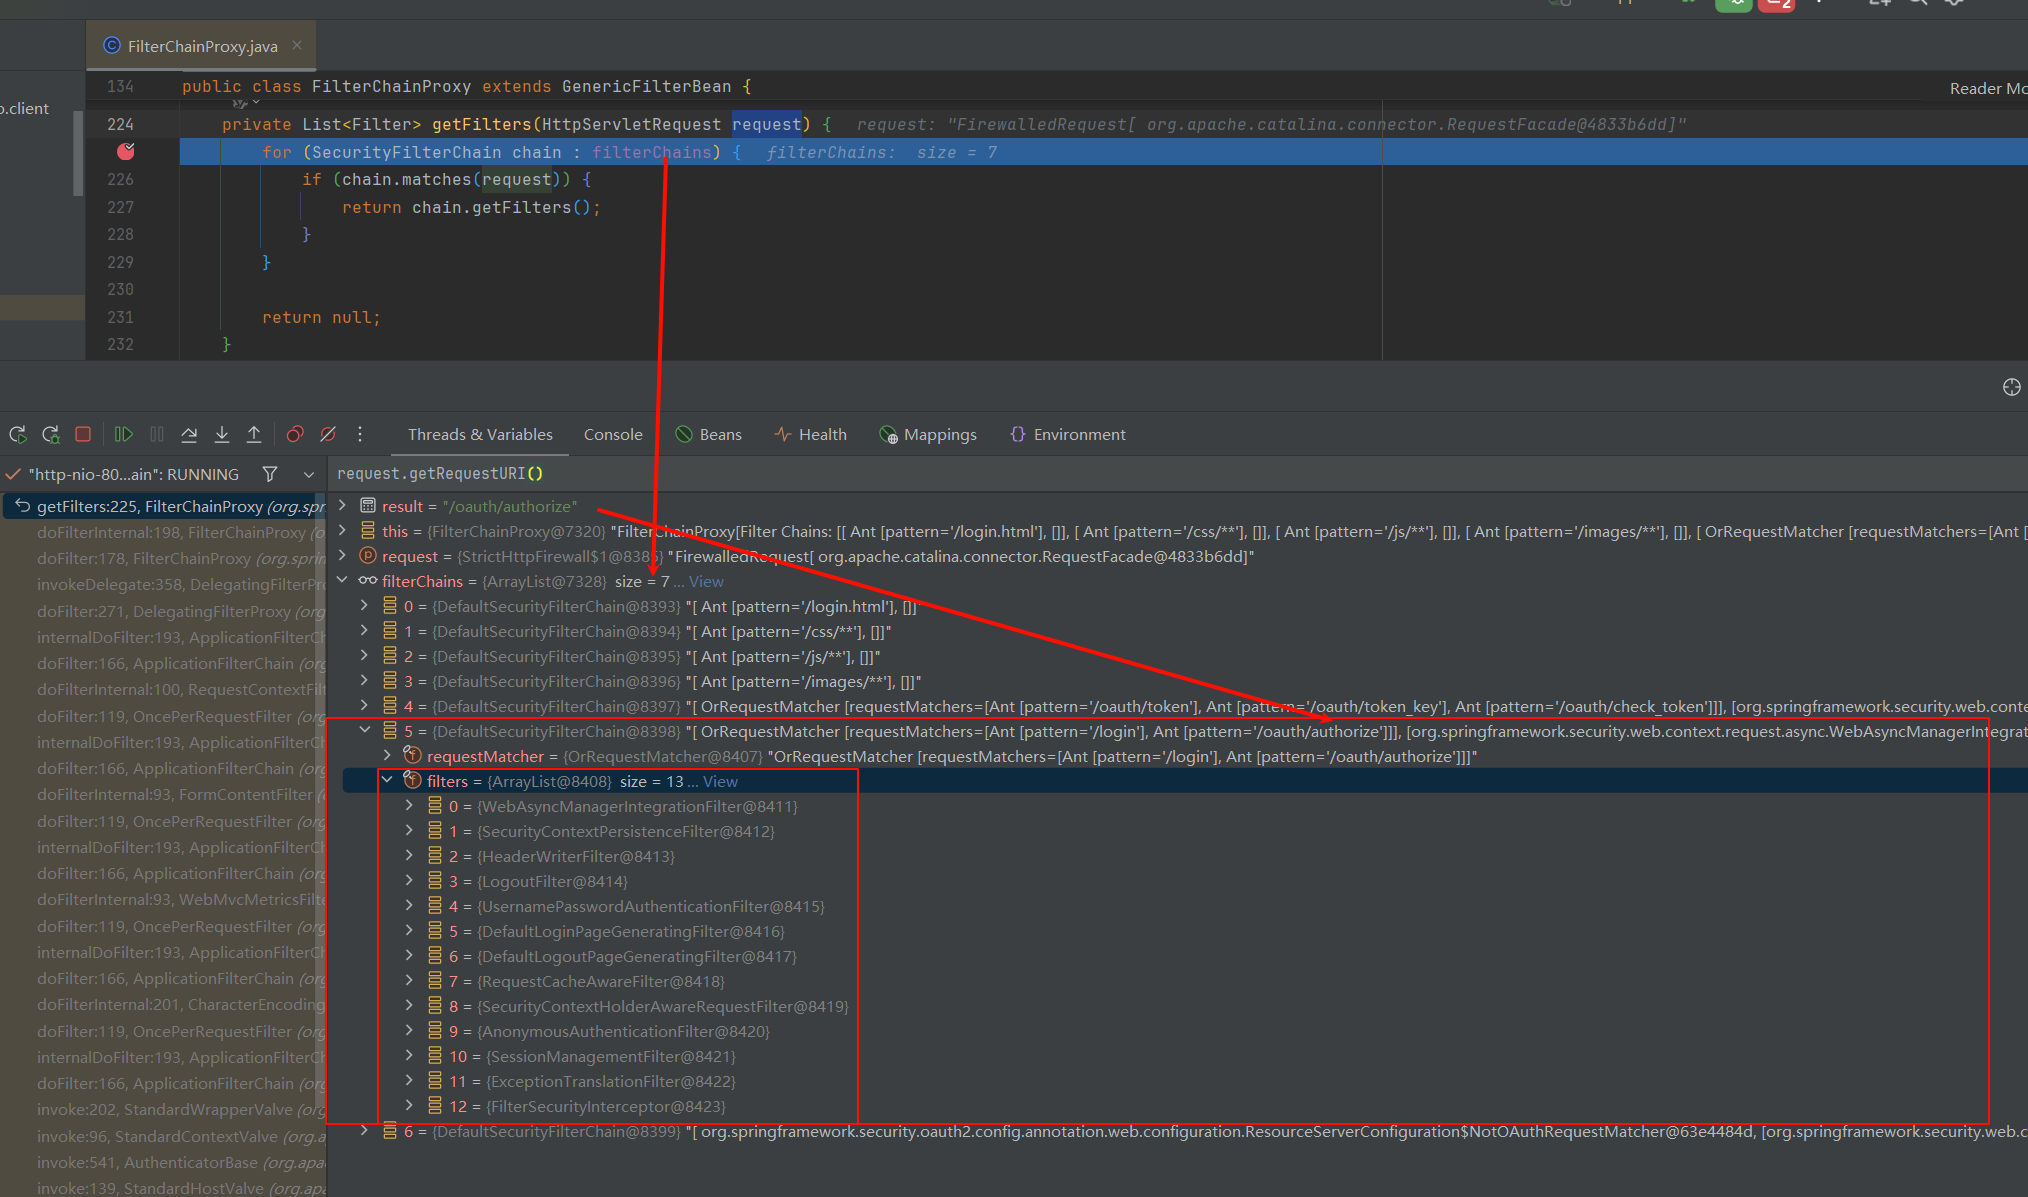
原始过滤器共有6个,4号位置则是SpringSecurity对应的FilterChainProxy,其内部链如下图:
其中,.login.html,/css/**等是我们配置的静态资源放行, 4,5号位置的则是我们单点登录相关的过滤器链。
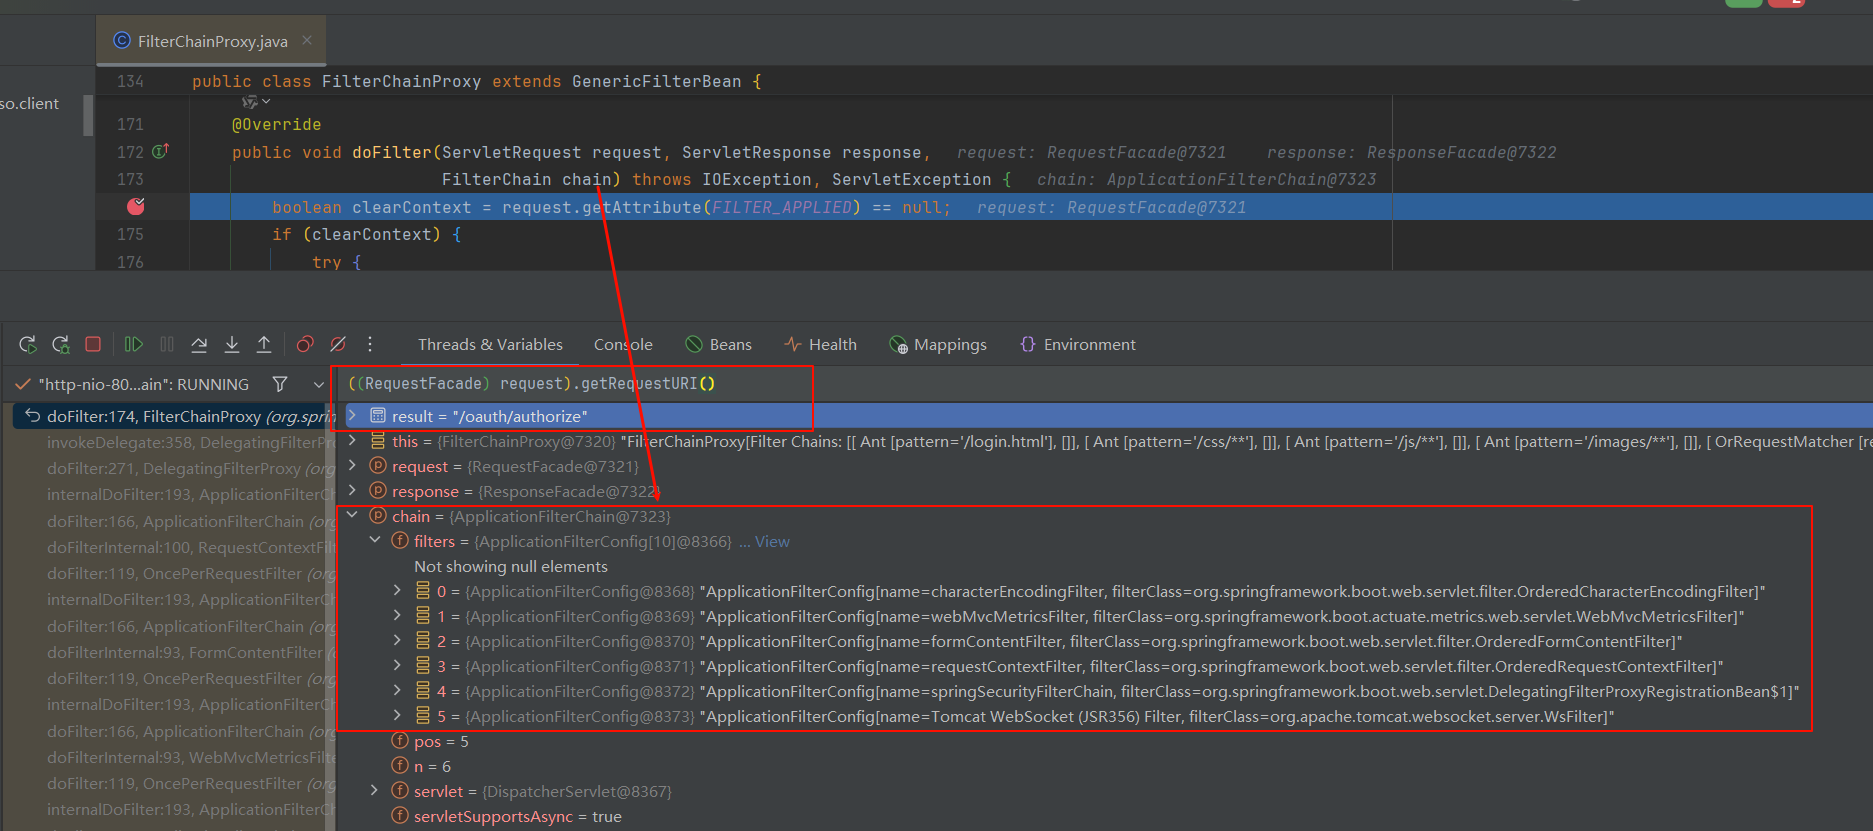
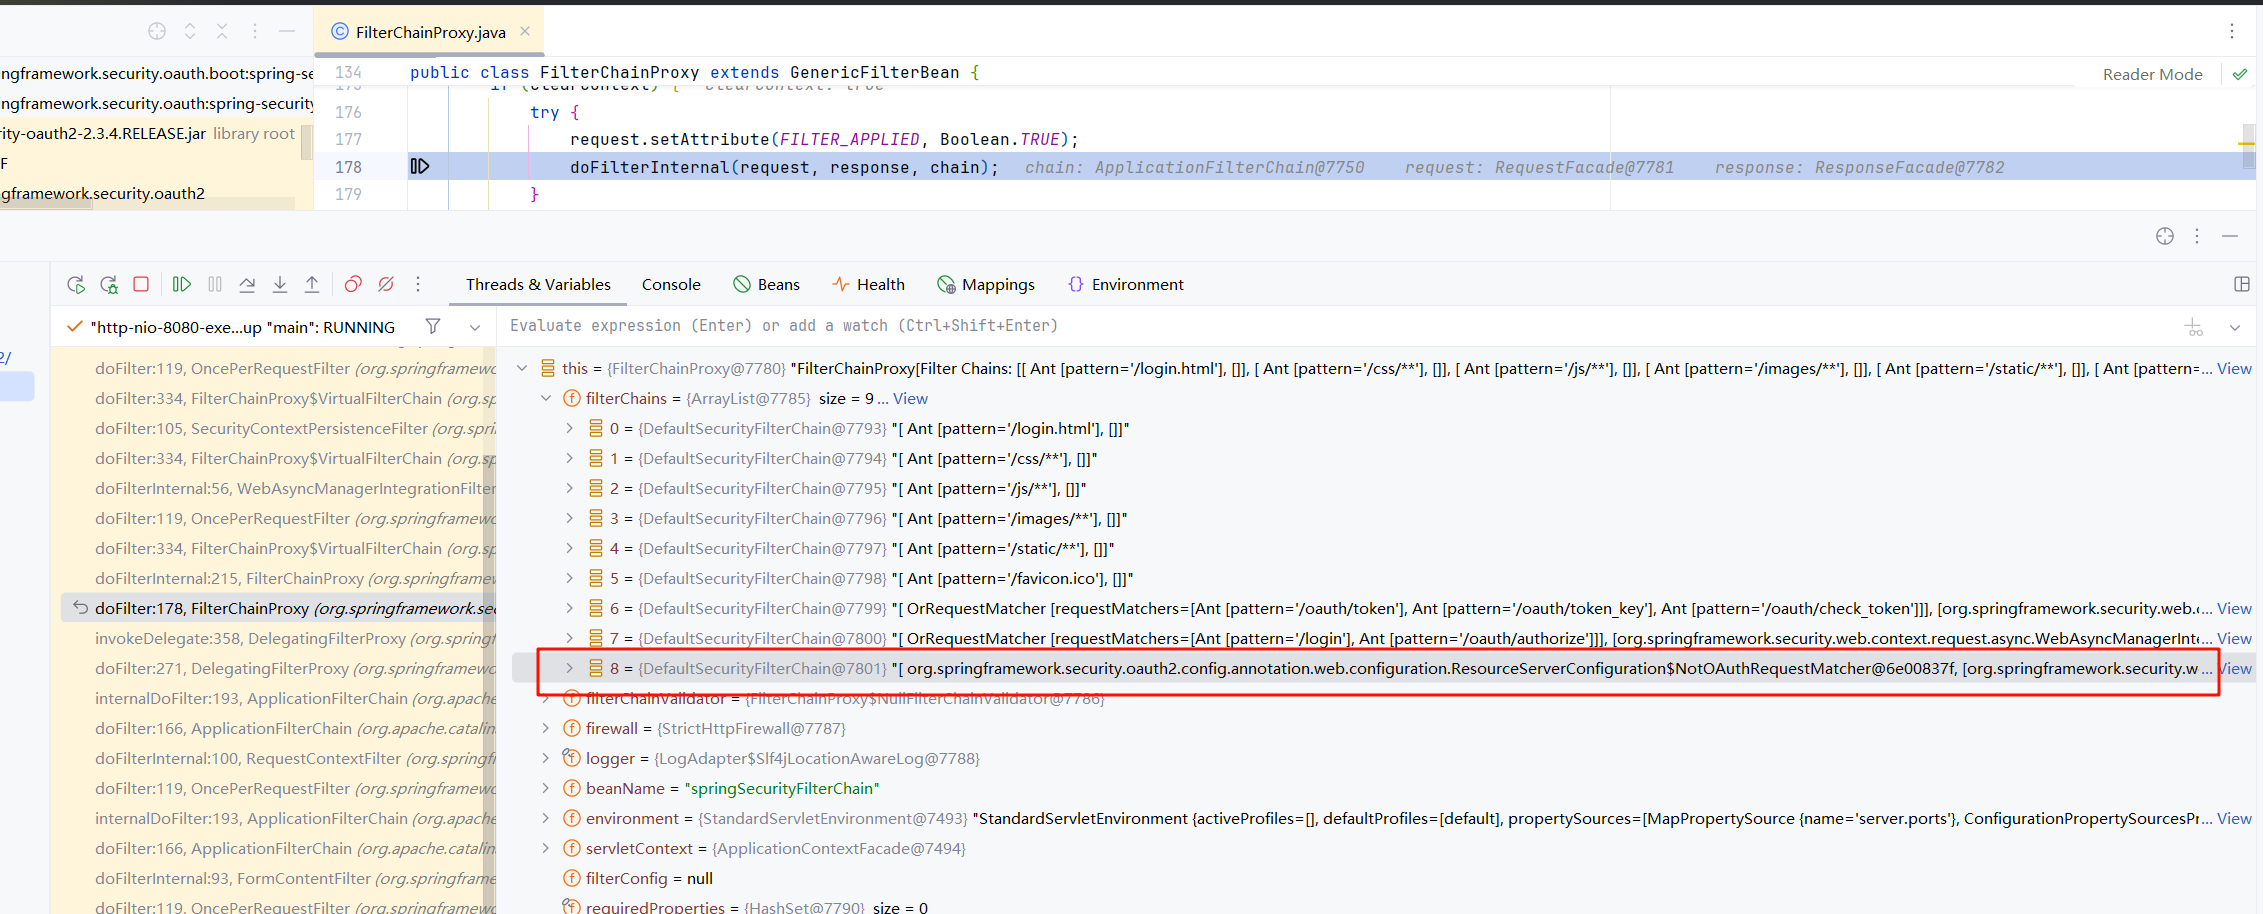
2.1. 第一次获取授权/oauth/authorize 第一次重定向到获取授权码的时候肯定是会被拦截的,那么我们来看是怎么被拦截下来然后重定向到登录界面的,从上面的图知道,是在FilterChainProxy选择一个执行,那么我们先debug到FilterChainProxy来
检查是不是/oauth/authorize,没问题,然后我们在往下看如何组装VirtualFilterChain
1
2
3
4
5
6
7
8
9
10
11
private void doFilterInternal (ServletRequest request, ServletResponse response,FilterChain chain) throws IOException, ServletException { FirewalledRequest fwRequest = firewall.getFirewalledRequest((HttpServletRequest) request); HttpServletResponse fwResponse = firewall.getFirewalledResponse((HttpServletResponse) response); List<Filter> filters = getFilters(fwRequest); VirtualFilterChain vfc = new VirtualFilterChain (fwRequest, chain, filters); vfc.doFilter(fwRequest, fwResponse); }
在getFilters()中最后会选择
可以看到/login和/oauth/authorize都走的是这条链FilterSecurityInterceptor,这个过滤器是SPringSecurity用来做权限验证的,由于我们此时没登录,也不是登录接口,UsernamePasswordAuthenticationFilter只是进去过了一下并没有登录,后续AnomymousAuthticationFilter会组装一个匿名的用户,因此,到FilterSecurityInterceptor权限验证是不通过的,因此报错。
我们跟一下FilterSecurityInterceptor的代码
1
2
3
4
5
6
public class FilterSecurityInterceptor extends AbstractSecurityInterceptor implements Filter { public void doFilter (ServletRequest request, ServletResponse response,FilterChain chain) throws IOException, ServletException { FilterInvocation fi = new FilterInvocation (request, response, chain); invoke(fi); }
首先进入invork方法,同样这里只保留核心代码
1
2
3
4
5
6
7
8
9
10
11
12
13
14
15
16
17
18
public void invoke (FilterInvocation fi) throws IOException, ServletException { if ((fi.getRequest() != null ) } else { InterceptorStatusToken token = super .beforeInvocation(fi); try { fi.getChain().doFilter(fi.getRequest(), fi.getResponse()); } finally { super .finallyInvocation(token); } super .afterInvocation(token, null ); } }
再看前置校验方法
1
2
3
4
5
6
7
8
9
10
11
12
13
14
15
16
protected InterceptorStatusToken beforeInvocation (Object object) { Authentication authenticated = authenticateIfRequired(); try { this .accessDecisionManager.decide(authenticated, object, attributes); } catch (AccessDeniedException accessDeniedException) { publishEvent(new AuthorizationFailureEvent (object, attributes, authenticated, accessDeniedException)); throw accessDeniedException; } }
上面异常退出,这里就应该进入过滤器的catch和finally方法了,过滤器回滚,往上一个就是异常处理过滤器ExceptionTranslationFilter,这里会封装一个重定向的异常回去。
1
2
3
4
5
6
7
8
9
10
11
12
13
14
15
16
17
18
19
20
21
22
23
24
25
26
27
28
29
30
31
32
33
public class ExceptionTranslationFilter extends GenericFilterBean { public void doFilter (ServletRequest req, ServletResponse res, FilterChain chain) throws IOException, ServletException { HttpServletRequest request = (HttpServletRequest) req; HttpServletResponse response = (HttpServletResponse) res; try { chain.doFilter(request, response); } catch (IOException ex) { throw ex; } catch (Exception ex) { Throwable[] causeChain = throwableAnalyzer.determineCauseChain(ex); RuntimeException ase = (AuthenticationException) throwableAnalyzer .getFirstThrowableOfType(AuthenticationException.class, causeChain); if (ase == null ) { ase = (AccessDeniedException) throwableAnalyzer.getFirstThrowableOfType( AccessDeniedException.class, causeChain); } if (ase != null ) { handleSpringSecurityException(request, response, chain, ase); } else { } } } }
1
2
3
4
5
6
7
8
9
10
11
12
13
14
15
16
17
18
19
20
21
22
23
24
private void handleSpringSecurityException (HttpServletRequest request,HttpServletResponse response, FilterChain chain, RuntimeException exception) throws IOException, ServletException { if (exception instanceof AuthenticationException) { } else if (exception instanceof AccessDeniedException) { Authentication authentication = SecurityContextHolder.getContext().getAuthentication(); if (authenticationTrustResolver.isAnonymous(authentication) || authenticationTrustResolver.isRememberMe(authentication)) { sendStartAuthentication( request, response, chain, new InsufficientAuthenticationException ( messages.getMessage( "ExceptionTranslationFilter.insufficientAuthentication" , "Full authentication is required to access this resource" ))); } else { } } }
1
2
3
4
5
6
7
protected void sendStartAuthentication (HttpServletRequest request,HttpServletResponse response, FilterChain chain,AuthenticationException reason) throws ServletException, IOException { SecurityContextHolder.getContext().setAuthentication(null ); requestCache.saveRequest(request, response); authenticationEntryPoint.commence(request, response, reason); }
再看LoginUrlAuthenticationEntryPoint
1
2
3
4
5
6
7
8
9
10
11
12
13
14
15
16
17
18
public class LoginUrlAuthenticationEntryPoint implements AuthenticationEntryPoint ,InitializingBean { public void commence (HttpServletRequest request, HttpServletResponse response,AuthenticationException authException) throws IOException, ServletException { String redirectUrl = null ; if (useForward) { } else { redirectUrl = buildRedirectUrlToLoginPage(request, response, authException); } redirectStrategy.sendRedirect(request, response, redirectUrl); } }
1
2
3
4
5
6
7
8
9
10
11
12
13
14
15
16
17
18
19
20
21
22
23
24
25
26
protected String buildRedirectUrlToLoginPage (HttpServletRequest request,HttpServletResponse response, AuthenticationException authException) { String loginForm = determineUrlToUseForThisRequest(request, response, authException); if (UrlUtils.isAbsoluteUrl(loginForm)) { return loginForm; } int serverPort = portResolver.getServerPort(request); String scheme = request.getScheme(); RedirectUrlBuilder urlBuilder = new RedirectUrlBuilder (); urlBuilder.setScheme(scheme); urlBuilder.setServerName(request.getServerName()); urlBuilder.setPort(serverPort); urlBuilder.setContextPath(request.getContextPath()); urlBuilder.setPathInfo(loginForm); if (forceHttps && "http" .equals(scheme)) { } return urlBuilder.getUrl(); }
之后就一路返回到前端,浏览器重定向到登录接口http://localhost:8080/login,接下来就会访问登录页面获取登录地址了
2.2. 请求登录页面 GET /login 由上面/oauth/authorize接口分析得知,login也是会走相同的过滤器链的
再往下走,会进入到DefaultLoginPageGeneratingFilter这个类来
1
2
3
4
5
6
7
8
9
10
11
12
13
14
15
16
17
18
19
20
21
22
23
24
25
26
27
28
29
30
31
32
33
34
35
36
37
38
39
40
41
42
43
44
45
46
47
48
49
50
51
52
53
54
55
56
57
58
59
60
61
62
63
64
65
66
67
68
69
70
71
72
73
74
75
76
77
78
public class DefaultLoginPageGeneratingFilter extends GenericFilterBean { public void doFilter (ServletRequest req, ServletResponse res, FilterChain chain) throws IOException, ServletException { HttpServletRequest request = (HttpServletRequest) req; HttpServletResponse response = (HttpServletResponse) res; boolean loginError = isErrorPage(request); boolean logoutSuccess = isLogoutSuccess(request); if (isLoginUrlRequest(request) || loginError || logoutSuccess) { String loginPageHtml = generateLoginPageHtml(request, loginError,logoutSuccess); response.setContentType("text/html;charset=UTF-8" ); response.setContentLength(loginPageHtml.getBytes(StandardCharsets.UTF_8).length); response.getWriter().write(loginPageHtml); return ; } chain.doFilter(request, response); } private String generateLoginPageHtml (HttpServletRequest request, boolean loginError, boolean logoutSuccess) { String errorMsg = "Invalid credentials" ; StringBuilder sb = new StringBuilder (); sb.append("<!DOCTYPE html>\n" + "<html lang=\"en\">\n" + " <head>\n" + " <meta charset=\"utf-8\">\n" + " <meta name=\"viewport\" content=\"width=device-width, initial-scale=1, shrink-to-fit=no\">\n" + " <meta name=\"description\" content=\"\">\n" + " <meta name=\"author\" content=\"\">\n" + " <title>Please sign in</title>\n" + " <link href=\"https://maxcdn.bootstrapcdn.com/bootstrap/4.0.0-beta/css/bootstrap.min.css\" rel=\"stylesheet\" integrity=\"sha384-/Y6pD6FV/Vv2HJnA6t+vslU6fwYXjCFtcEpHbNJ0lyAFsXTsjBbfaDjzALeQsN6M\" crossorigin=\"anonymous\">\n" + " <link href=\"https://getbootstrap.com/docs/4.0/examples/signin/signin.css\" rel=\"stylesheet\" crossorigin=\"anonymous\"/>\n" + " </head>\n" + " <body>\n" + " <div class=\"container\">\n" ); String contextPath = request.getContextPath(); if (this .formLoginEnabled) { sb.append(" <form class=\"form-signin\" method=\"post\" action=\"" + contextPath + this .authenticationUrl + "\">\n" + " <h2 class=\"form-signin-heading\">Please sign in</h2>\n" + createError(loginError, errorMsg) + createLogoutSuccess(logoutSuccess) + " <p>\n" + " <label for=\"username\" class=\"sr-only\">Username</label>\n" + " <input type=\"text\" id=\"username\" name=\"" + this .usernameParameter + "\" class=\"form-control\" placeholder=\"Username\" required autofocus>\n" + " </p>\n" + " <p>\n" + " <label for=\"password\" class=\"sr-only\">Password</label>\n" + " <input type=\"password\" id=\"password\" name=\"" + this .passwordParameter + "\" class=\"form-control\" placeholder=\"Password\" required>\n" + " </p>\n" + createRememberMe(this .rememberMeParameter) + renderHiddenInputs(request) + " <button class=\"btn btn-lg btn-primary btn-block\" type=\"submit\">Sign in</button>\n" + " </form>\n" ); } if (openIdEnabled) { } if (oauth2LoginEnabled) { } if (this .saml2LoginEnabled) { } sb.append("</div>\n" ); sb.append("</body></html>" ); return sb.toString(); } }
这样构建登录页就完成了,然后返回。
最终构建这样一个页面
1
2
3
4
5
6
7
8
9
10
11
12
13
14
15
16
17
18
19
20
21
22
23
24
25
26
27
<!DOCTYPE html > <html lang ="en" > <head > <meta charset ="utf-8" > <meta name ="viewport" content ="width=device-width, initial-scale=1, shrink-to-fit=no" > <meta name ="description" content ="" > <meta name ="author" content ="" > <title > Please sign in</title > <link href ="https://maxcdn.bootstrapcdn.com/bootstrap/4.0.0-beta/css/bootstrap.min.css" rel ="stylesheet" integrity ="sha384-/Y6pD6FV/Vv2HJnA6t+vslU6fwYXjCFtcEpHbNJ0lyAFsXTsjBbfaDjzALeQsN6M" crossorigin ="anonymous" > <link href ="https://getbootstrap.com/docs/4.0/examples/signin/signin.css" rel ="stylesheet" crossorigin ="anonymous" /> </head > <body > <div class ="container" > <form class ="form-signin" method ="post" action ="/login" > <h2 class ="form-signin-heading" > Please sign in</h2 > <p > <label for ="username" class ="sr-only" > Username</label > <input type ="text" id ="username" name ="username" class ="form-control" placeholder ="Username" required autofocus > </p > <p > <label for ="password" class ="sr-only" > Password</label > <input type ="password" id ="password" name ="password" class ="form-control" placeholder ="Password" required > </p > <button class ="btn btn-lg btn-primary btn-block" type ="submit" > Sign in</button > </form > </div > </body > </html >
PS: 话说以前还有个稍微好看点的登录界面,现在就纯白了哟。
2.3. 登录 POST /login 登录就和SpringSecurity正常的登录差不多了,就在UsernamePasswordAuthenticationFilter中处理,然后写session和rememberme等,我们主要关心怎么重定向的。
经过跟踪源码,登录成功之后在AbstractAuthenticationProcessingFilter#successfulAuthentication()中会调用successHandler.onAuthenticationSuccess()方法处理登录成功后的逻辑
1
2
3
4
5
6
7
8
9
10
11
12
13
14
15
16
17
18
protected void successfulAuthentication (HttpServletRequest request, HttpServletResponse response, FilterChain chain, Authentication authResult) throws IOException, ServletException { SecurityContextHolder.getContext().setAuthentication(authResult); rememberMeServices.loginSuccess(request, response, authResult); if (this .eventPublisher != null ) { eventPublisher.publishEvent(new InteractiveAuthenticationSuccessEvent ( authResult, this .getClass())); } successHandler.onAuthenticationSuccess(request, response, authResult); }
此successHandler是SavedRequestAwareAuthenticationSuccessHandler,类上的文字翻译过来是这样的ExceptionTranslationFilter中也就是异常处理中就封装DefaultSavedRequest存好了,现在登录成功了就要跳转到原来的页面,也就是要取回DefaultSavedRequest。
我们来看这个SavedRequestAwareAuthenticationSuccessHandler
1
2
3
4
5
6
7
8
9
10
11
12
13
14
public class SavedRequestAwareAuthenticationSuccessHandler extends SimpleUrlAuthenticationSuccessHandler { public void onAuthenticationSuccess (HttpServletRequest request, HttpServletResponse response, Authentication authentication) throws ServletException, IOException { SavedRequest savedRequest = requestCache.getRequest(request, response); String targetUrl = savedRequest.getRedirectUrl(); getRedirectStrategy().sendRedirect(request, response, targetUrl); } }
那这个requestCache.getRequest()是什么呢,进它的源码看,它是从session中获取attribute,也就是说原来的原始请求可能存在了session中
1
2
3
4
5
6
7
8
9
10
11
public class HttpSessionRequestCache implements RequestCache { public SavedRequest getRequest (HttpServletRequest currentRequest, HttpServletResponse response) { HttpSession session = currentRequest.getSession(false ); if (session != null ) { return (SavedRequest) session.getAttribute(this .sessionAttrName); } return null ; } }
这里就明白了,和预想的一样,那么设置这个的地方应该就是ExceptionTranslationFilter了,也可以从HttpSessionRequestCache#saveRequest()保存到session的方法倒推,只有ExceptionTranslationFilter在调用。
已经补到了上面异常处理ExceptionTranslationFilter#sendStartAuthentication()中
这里其实是前后端不分离SpringSecurity默认的实现逻辑。
到这里登录就完成了,而且又会重定向到/oauth/authorize
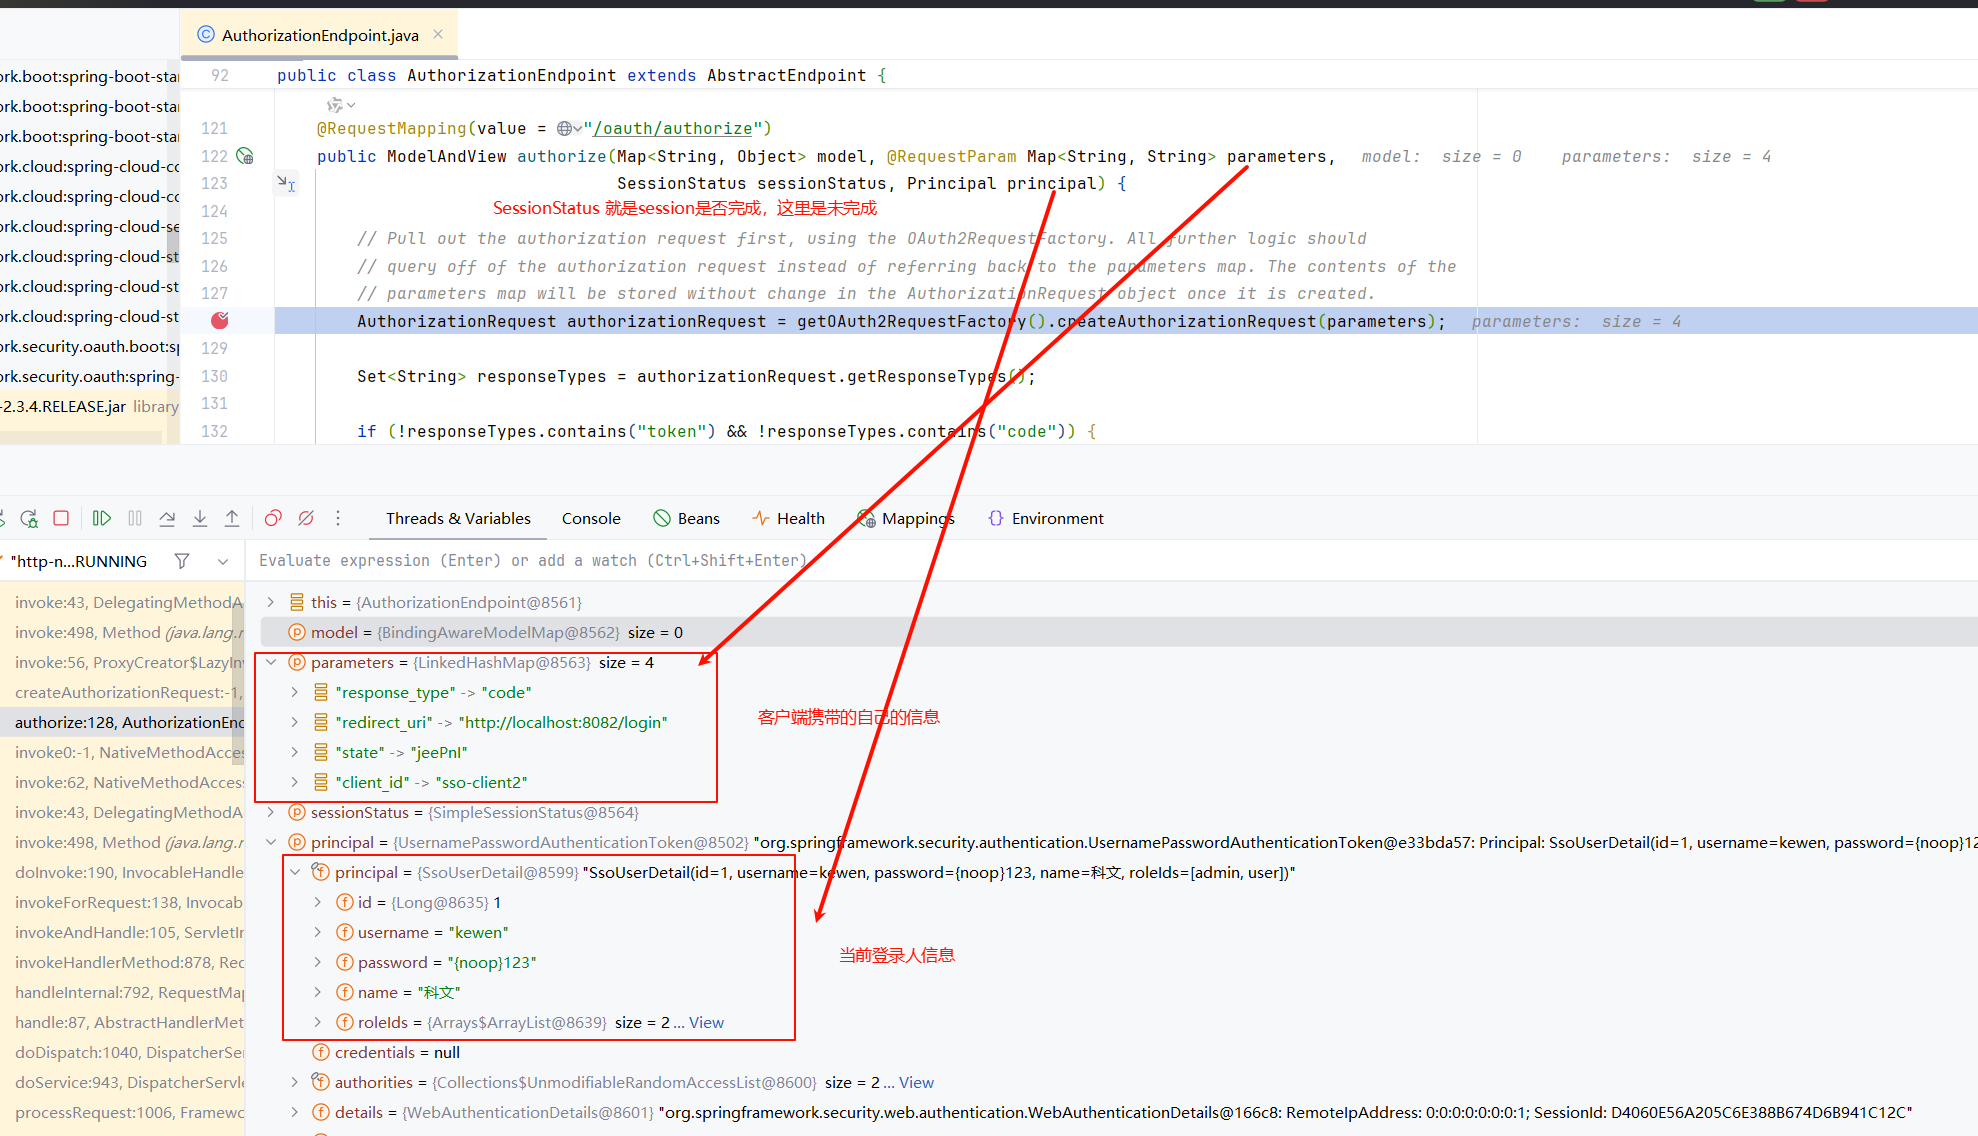
2.4. 第二次获取授权/oauth/authorize 第二次获取授权也是走的和登录一样的过滤器链,这次肯定就通过了,因为已经登录成功了,那就会穿过所有的过滤器来到真正的业务,到了spring-security-oauth依赖的AuthorizationEndpoint中,这可以等价于是SpringMVC的一个Controller方法。具体可以看public class FrameworkEndpointHandlerMapping extends RequestMappingHandlerMapping {}从它的继承关系就可以看出,和controller类似,重新构造一个的原因可能是不想要Springmvc那么复杂吧。
这已经是一个业务层面的方法调用了,只要找到AuthorizationEndpoint这个端点,就很容易理解到其中的逻辑了,难点应该是在配置上面,后续可以再分析配置。现在只大概看一下外层的逻辑,毕竟文章已经很长了。
1
2
3
4
5
6
7
8
9
10
11
12
13
14
15
16
17
18
19
20
21
22
23
24
25
26
27
28
29
30
31
32
33
34
35
36
37
38
39
40
41
42
43
44
45
46
47
48
49
50
51
52
53
54
55
56
57
58
59
60
61
62
63
64
65
66
67
68
public class AuthorizationEndpoint extends AbstractEndpoint { @RequestMapping(value = "/oauth/authorize") public ModelAndView authorize (Map<String, Object> model, @RequestParam Map<String, String> parameters, SessionStatus sessionStatus, Principal principal) { AuthorizationRequest authorizationRequest = getOAuth2RequestFactory().createAuthorizationRequest(parameters); Set<String> responseTypes = authorizationRequest.getResponseTypes(); if (!responseTypes.contains("token" ) && !responseTypes.contains("code" )) { throw new UnsupportedResponseTypeException ("Unsupported response types: " + responseTypes); } if (authorizationRequest.getClientId() == null ) { throw new InvalidClientException ("A client id must be provided" ); } try { ClientDetails client = getClientDetailsService().loadClientByClientId(authorizationRequest.getClientId()); String redirectUriParameter = authorizationRequest.getRequestParameters().get(OAuth2Utils.REDIRECT_URI); String resolvedRedirect = redirectResolver.resolveRedirect(redirectUriParameter, client); if (!StringUtils.hasText(resolvedRedirect)) { throw new RedirectMismatchException ( "A redirectUri must be either supplied or preconfigured in the ClientDetails" ); } authorizationRequest.setRedirectUri(resolvedRedirect); oauth2RequestValidator.validateScope(authorizationRequest, client); authorizationRequest = userApprovalHandler.checkForPreApproval(authorizationRequest, (Authentication) principal); boolean approved = userApprovalHandler.isApproved(authorizationRequest, (Authentication) principal); authorizationRequest.setApproved(approved); if (authorizationRequest.isApproved()) { if (responseTypes.contains("token" )) { return getImplicitGrantResponse(authorizationRequest); } if (responseTypes.contains("code" )) { return new ModelAndView (getAuthorizationCodeResponse(authorizationRequest, (Authentication) principal)); } } model.put(AUTHORIZATION_REQUEST_ATTR_NAME, authorizationRequest); model.put(ORIGINAL_AUTHORIZATION_REQUEST_ATTR_NAME, unmodifiableMap(authorizationRequest)); return getUserApprovalPageResponse(model, authorizationRequest, (Authentication) principal); } catch (RuntimeException e) { sessionStatus.setComplete(); throw e; } } }
这里需要注意一个优化点 ,这个接口服务会大量调用ClientDetailsService#loadClientByClientId()方法,也就是我们自己定义的加载客户端信息的方法,因此我们实现的时候应当要注意缓存一下,将数据客户端缓存几分钟。(ThreadLocal不行,因为不同的线程来访问的,建议使用guava的CacheLoader)
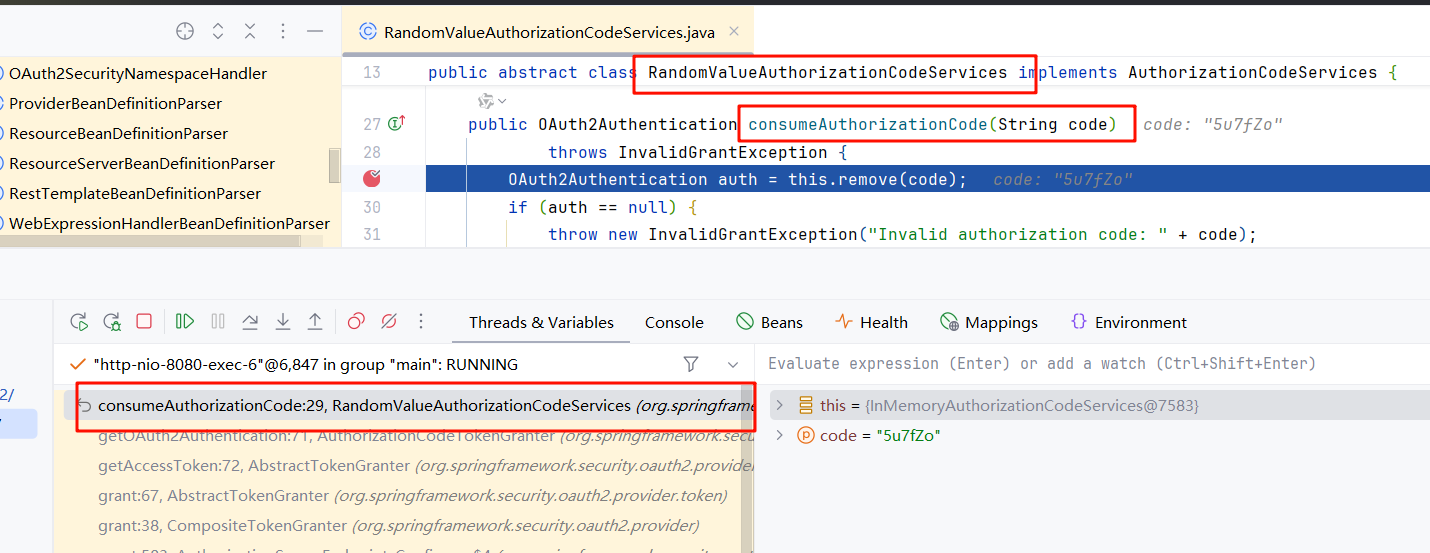
加量看一下存code的逻辑
1
2
3
4
5
6
7
8
9
10
11
12
13
14
15
16
17
18
19
20
21
22
23
24
25
26
27
28
29
30
public class AuthorizationEndpoint extends AbstractEndpoint { private View getAuthorizationCodeResponse (AuthorizationRequest authorizationRequest, Authentication authUser) { try { return new RedirectView (getSuccessfulRedirect(authorizationRequest, generateCode(authorizationRequest, authUser)), false , true , false ); } catch (OAuth2Exception e) { return new RedirectView (getUnsuccessfulRedirect(authorizationRequest, e, false ), false , true , false ); } } private String generateCode (AuthorizationRequest authorizationRequest, Authentication authentication) throws AuthenticationException { try { OAuth2Request storedOAuth2Request = getOAuth2RequestFactory().createOAuth2Request(authorizationRequest); OAuth2Authentication combinedAuth = new OAuth2Authentication (storedOAuth2Request, authentication); String code = authorizationCodeServices.createAuthorizationCode(combinedAuth); return code; } catch (OAuth2Exception e) { } } }
这里我们只看抽象类,实现就不看了,就一个ConcurrentHashMap保存,很简单
1
2
3
4
5
6
7
8
9
10
11
12
13
14
15
16
17
18
19
20
21
22
23
24
25
public abstract class RandomValueAuthorizationCodeServices implements AuthorizationCodeServices { private RandomValueStringGenerator generator = new RandomValueStringGenerator (); protected abstract void store (String code, OAuth2Authentication authentication) ; protected abstract OAuth2Authentication remove (String code) ; public String createAuthorizationCode (OAuth2Authentication authentication) { String code = generator.generate(); store(code, authentication); return code; } public OAuth2Authentication consumeAuthorizationCode (String code) throws InvalidGrantException { OAuth2Authentication auth = this .remove(code); if (auth == null ) { throw new InvalidGrantException ("Invalid authorization code: " + code); } return auth; } }
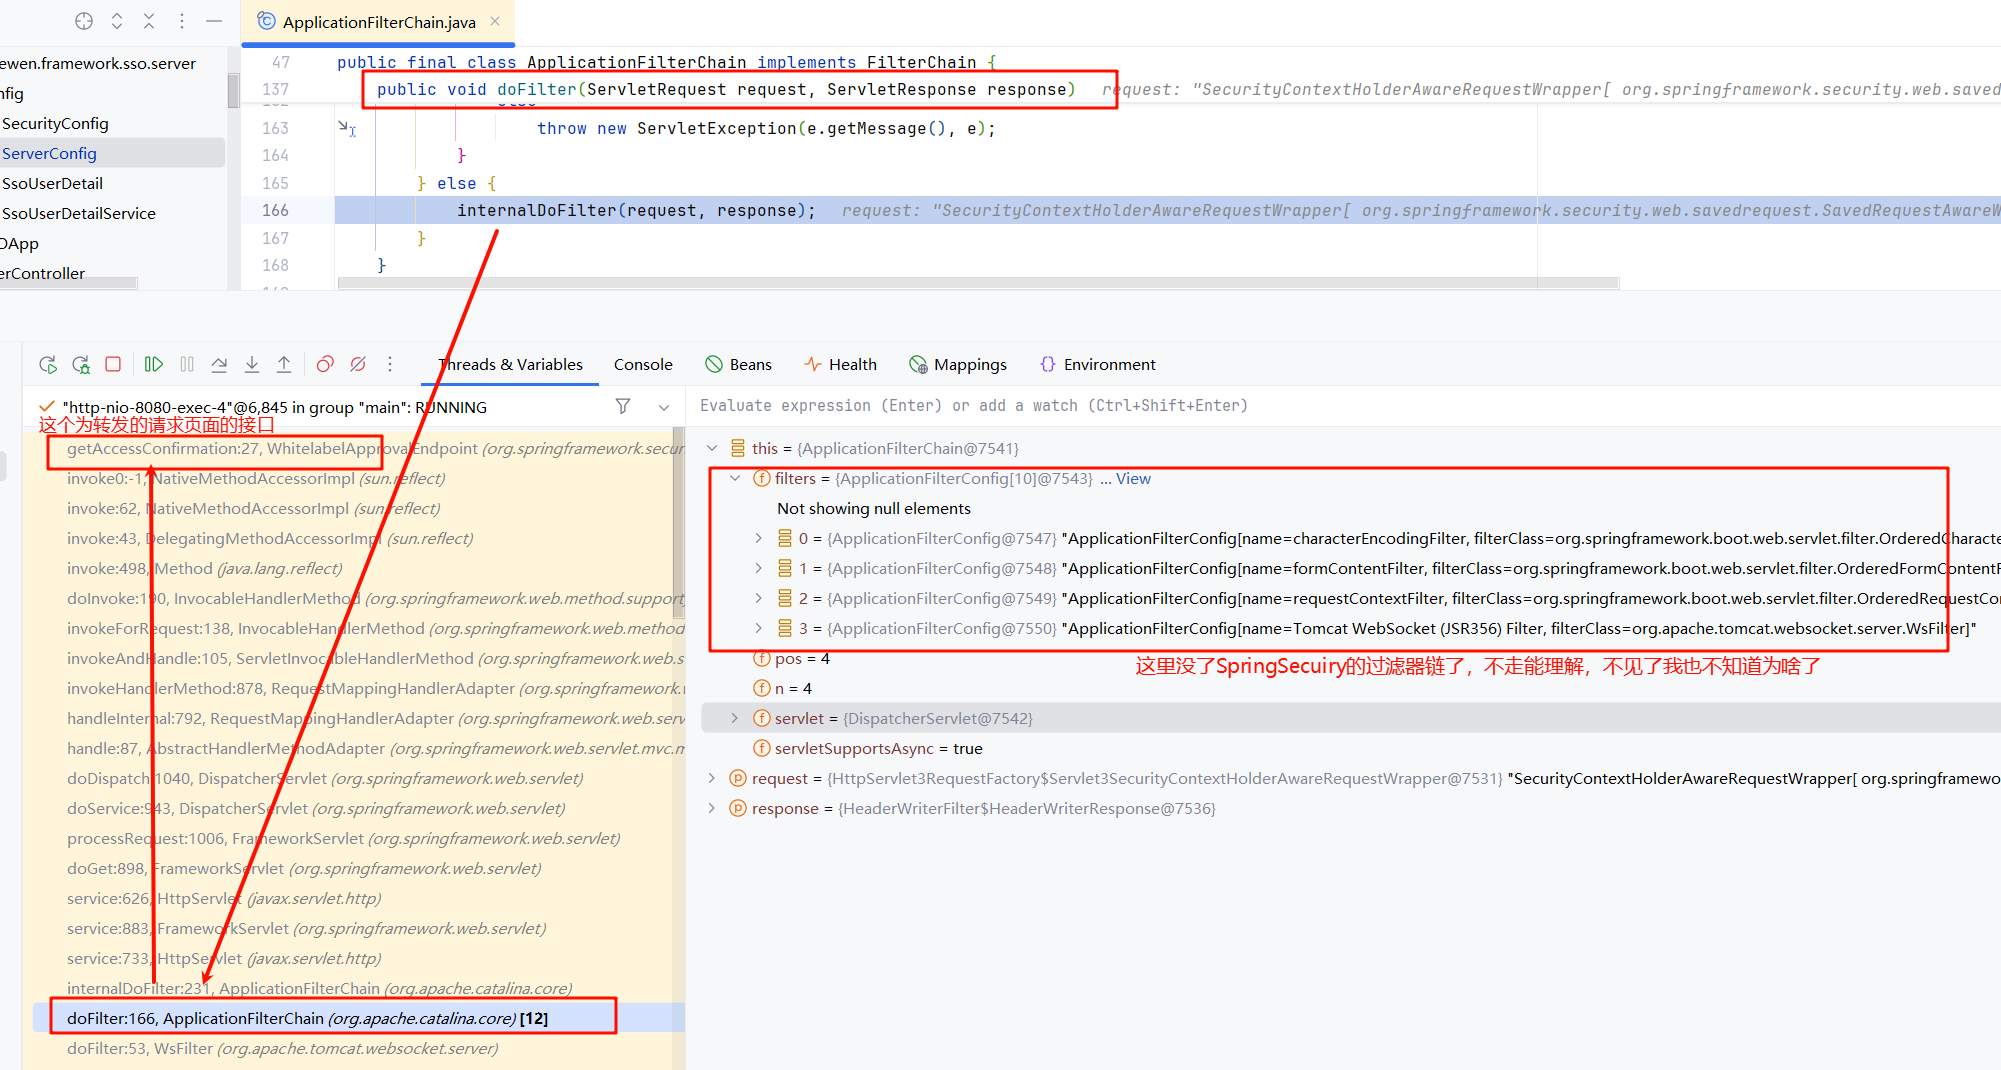
2.4.1. 转发请求页 转发页面这里有个需要注意的地方,就是它不走SpringSecurity的过滤器链,也能理解,毕竟只是返回一个页面而已
有个想不通的地方就是为啥SpringSecurity的过滤器链直接就没了
最终走到WhitelabelApprovalEndpoint这个端点类
1
2
3
4
5
6
7
8
9
10
11
12
13
14
15
16
17
18
19
20
21
22
23
24
25
26
27
28
@FrameworkEndpoint @SessionAttributes("authorizationRequest") public class WhitelabelApprovalEndpoint { @RequestMapping("/oauth/confirm_access") public ModelAndView getAccessConfirmation (Map<String, Object> model, HttpServletRequest request) throws Exception { final String approvalContent = createTemplate(model, request); if (request.getAttribute("_csrf" ) != null ) { model.put("_csrf" , request.getAttribute("_csrf" )); } View approvalView = new View () { @Override public String getContentType () { return "text/html" ; } @Override public void render (Map<String, ?> model, HttpServletRequest request, HttpServletResponse response) throws Exception { response.setContentType(getContentType()); response.getWriter().append(approvalContent); } }; return new ModelAndView (approvalView, model); } }
2.4.2. 授权完成后请求POST /oauth/authorize 还是请求/oauth/authorize,只不过这次是Post,执行的逻辑基本差不多,都是校验一遍,就不看了,有兴趣的可以进一步分析
1
2
3
4
5
6
7
8
9
10
11
12
13
public class AuthorizationEndpoint extends AbstractEndpoint { @RequestMapping(value = "/oauth/authorize", method = RequestMethod.POST, params = OAuth2Utils.USER_OAUTH_APPROVAL) public View approveOrDeny (@RequestParam Map<String, String> approvalParameters, Map<String, ?> model, SessionStatus sessionStatus, Principal principal) { try { return getAuthorizationCodeResponse(authorizationRequest, (Authentication) principal); } finally { sessionStatus.setComplete(); } } }
这样,在服务端的各种认证操作就算完成了,后续就只有认证客户端用code换取token了。
2.5. 客户端拿到code后到服务端的认证`` 客户端获取认证是直接POST方法调用接口,而不是走的重定向了,可以在客户端代码OAuth2ClientAuthenticationProcessingFilter#attemptAuthentication()中找到
1
2
3
4
5
6
7
8
9
10
11
12
13
14
15
16
17
18
19
20
21
22
23
24
25
26
27
28
29
30
31
public class OAuth2ClientAuthenticationProcessingFilter extends AbstractAuthenticationProcessingFilter { public Authentication attemptAuthentication (HttpServletRequest request, HttpServletResponse response) throws AuthenticationException, IOException, ServletException { OAuth2AccessToken accessToken; try { accessToken = restTemplate.getAccessToken(); } catch (OAuth2Exception e) { BadCredentialsException bad = new BadCredentialsException ("Could not obtain access token" , e); publish(new OAuth2AuthenticationFailureEvent (bad)); throw bad; } try { OAuth2Authentication result = tokenServices.loadAuthentication(accessToken.getValue()); if (authenticationDetailsSource!=null ) { request.setAttribute(OAuth2AuthenticationDetails.ACCESS_TOKEN_VALUE, accessToken.getValue()); request.setAttribute(OAuth2AuthenticationDetails.ACCESS_TOKEN_TYPE, accessToken.getTokenType()); result.setDetails(authenticationDetailsSource.buildDetails(request)); } publish(new AuthenticationSuccessEvent (result)); return result; } catch (InvalidTokenException e) { BadCredentialsException bad = new BadCredentialsException ("Could not obtain user details from token" , e); publish(new OAuth2AuthenticationFailureEvent (bad)); throw bad; } } }
端点打在刚才获取授权码那里RandomValueAuthorizationCodeServices#consumeAuthorizationCode(),既然要验证,肯定要获取授权码
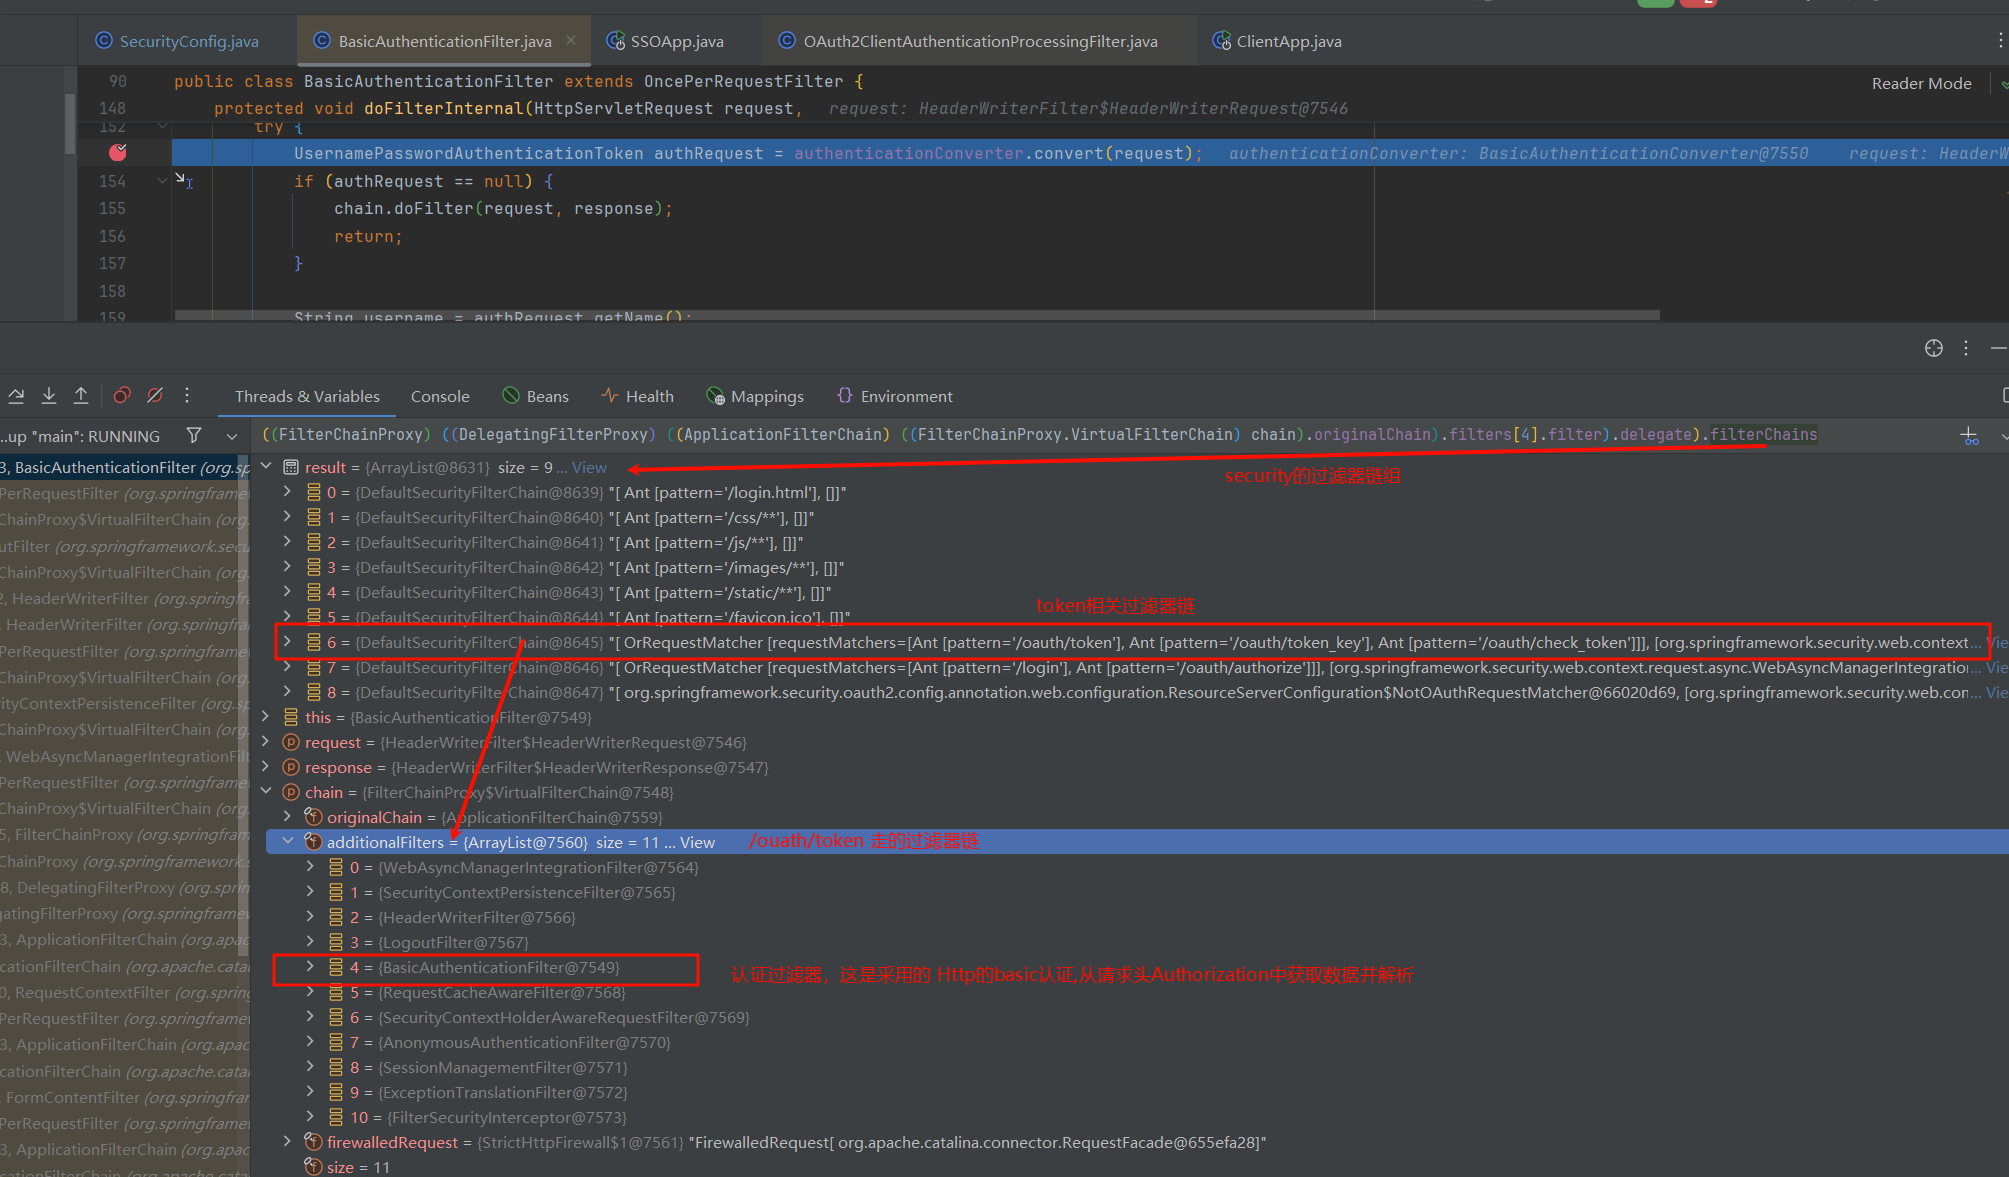
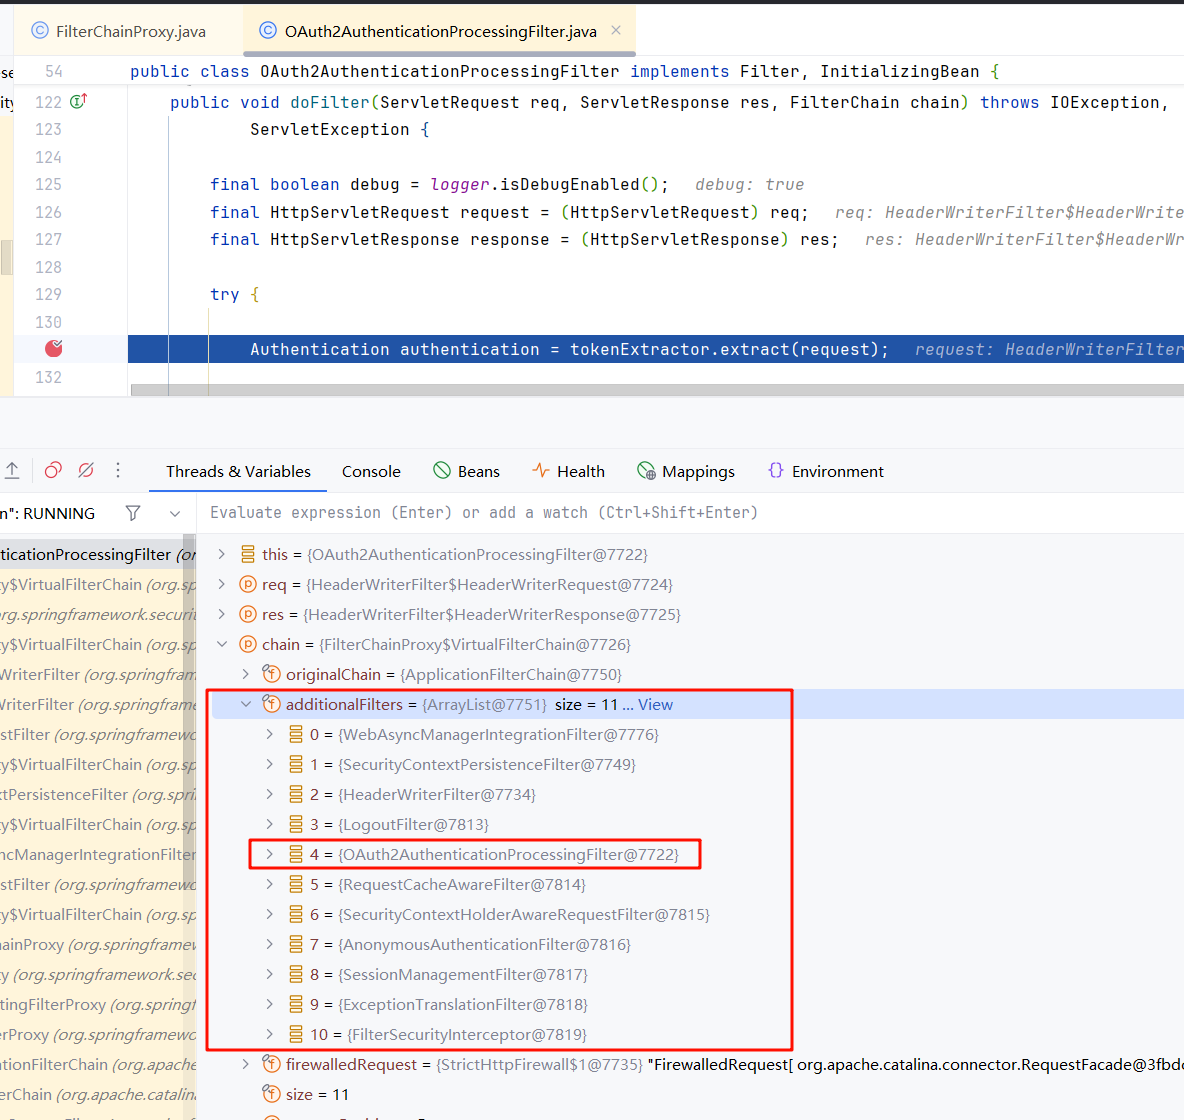
然后我们看一下走的是哪个过滤器链,跟踪栈往前找,如下图
找到过滤器没走用户登录这一条链,走的是客户端token这条链,因此此次访问不再有用户参与,主要是认证客户端的,而用户对应的信息是在生成授权码业务逻辑的code对应的缓存值中取出。
首先是客户端的登录
客户端登录时组装了Authorization请求头,将clientId和secretId加密,服务端这里解密使用的是Basic认证,从Header头中的Authorization字段取值并解析。
我们看BasicAuthenticationFilter源码
1
2
3
4
5
6
7
8
9
10
11
12
13
14
15
16
17
18
19
20
21
22
23
24
25
26
27
28
29
public class BasicAuthenticationFilter extends OncePerRequestFilter { protected void doFilterInternal (HttpServletRequest request, HttpServletResponse response, FilterChain chain) throws IOException, ServletException { try { UsernamePasswordAuthenticationToken authRequest = authenticationConverter.convert(request); if (authRequest == null ) { chain.doFilter(request, response); return ; } String username = authRequest.getName(); if (authenticationIsRequired(username)) { Authentication authResult = this .authenticationManager .authenticate(authRequest); SecurityContextHolder.getContext().setAuthentication(authResult); this .rememberMeServices.loginSuccess(request, response, authResult); onSuccessfulAuthentication(request, response, authResult); } } chain.doFilter(request, response); } }
值得注意的是这里登录完成之后会继续往下走,而不是和UsernamePasswordAuthenticationFilter一样结束返回前端了。
然后会进入到业务逻辑/auth/token,从栈中可以跟踪到端点在TokenEndpoint#getAccessToken()中
1
2
3
4
5
6
7
8
9
10
11
12
13
14
15
16
17
18
19
20
21
22
23
24
25
26
27
28
29
30
31
public class TokenEndpoint extends AbstractEndpoint { @RequestMapping(value = "/oauth/token", method=RequestMethod.POST) public ResponseEntity<OAuth2AccessToken> postAccessToken (Principal principal, @RequestParam Map<String, String> parameters) throws HttpRequestMethodNotSupportedException { String clientId = getClientId(principal); ClientDetails authenticatedClient = getClientDetailsService().loadClientByClientId(clientId); TokenRequest tokenRequest = getOAuth2RequestFactory().createTokenRequest(parameters, authenticatedClient); if (authenticatedClient != null ) { oAuth2RequestValidator.validateScope(tokenRequest, authenticatedClient); } if (isRefreshTokenRequest(parameters)) { tokenRequest.setScope(OAuth2Utils.parseParameterList(parameters.get(OAuth2Utils.SCOPE))); } OAuth2AccessToken token = getTokenGranter().grant(tokenRequest.getGrantType(), tokenRequest); if (token == null ) { throw new UnsupportedGrantTypeException ("Unsupported grant type: " + tokenRequest.getGrantType()); } return getResponse(token); } }
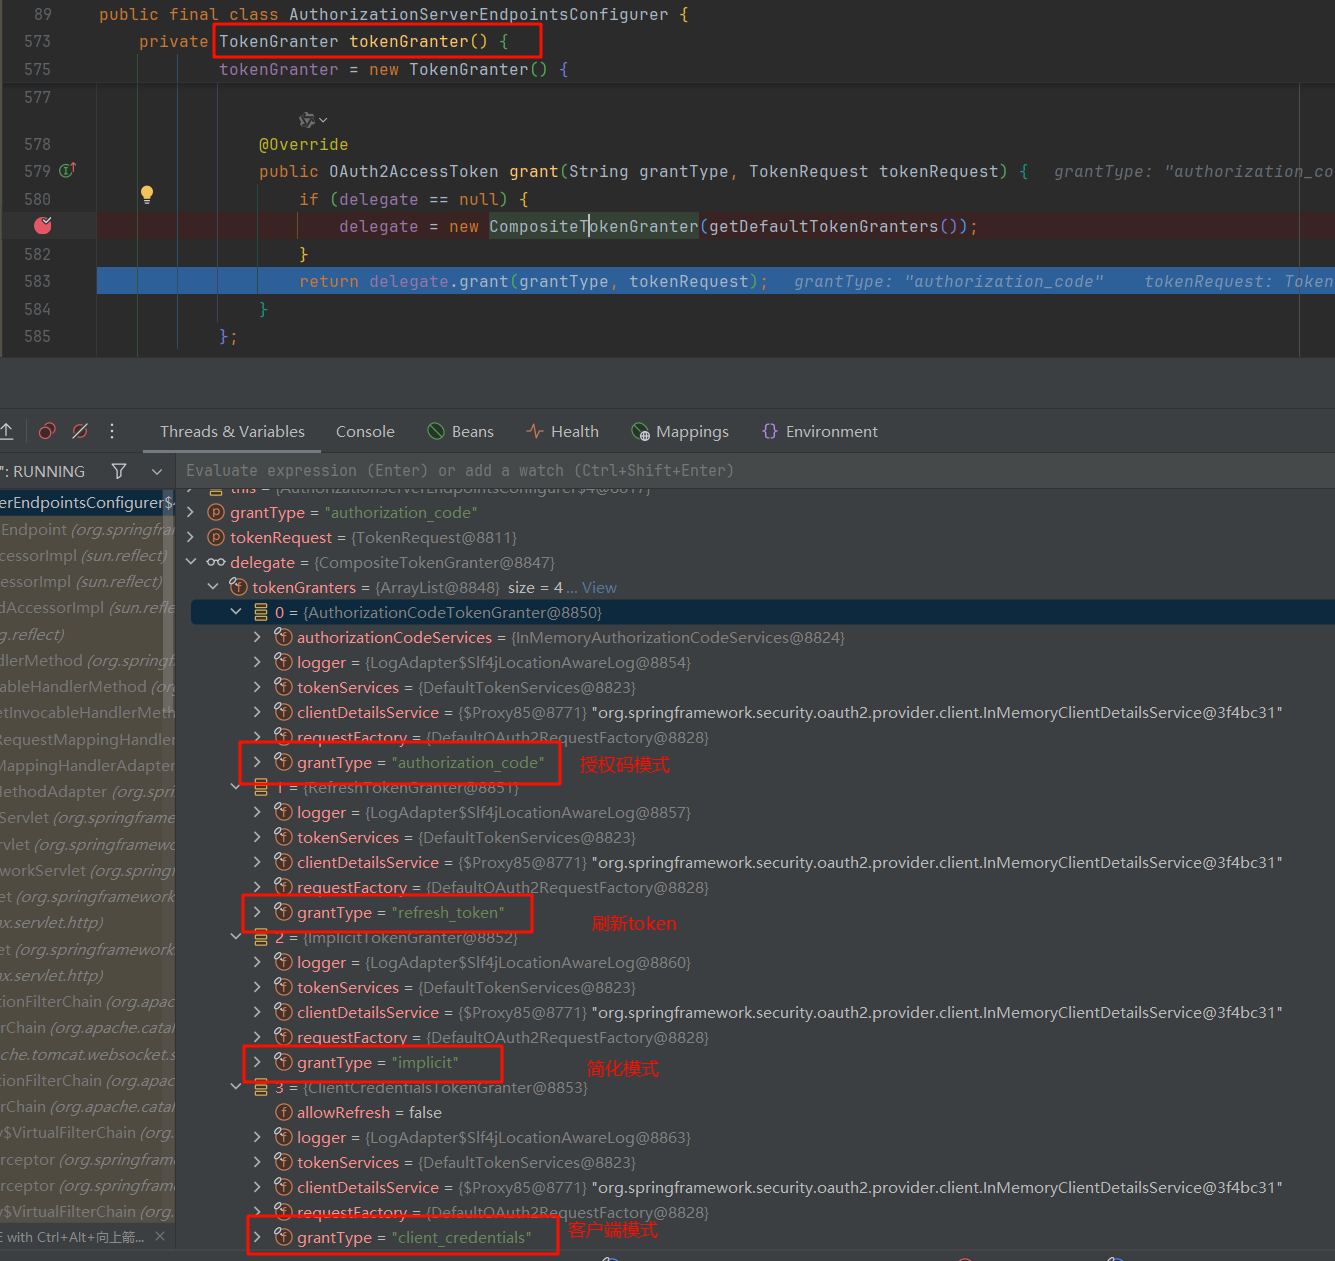
getTokenGranter()中会懒加载初始化四种模式,这也是我们token用到的几种
然后继续看grant方法,内部维护一个TokenGranter列表,其中我我们需要的是AuthorizationCodeTokenGranter
1 2 3 4 5 6 7 8 9 10 11 12 13 14 15 16 17 18 19 public abstract class AbstractTokenGranter implements TokenGranter { public OAuth2AccessToken grant (String grantType, TokenRequest tokenRequest) { String clientId = tokenRequest.getClientId(); ClientDetails client = clientDetailsService.loadClientByClientId(clientId); validateGrantType(grantType, client); return getAccessToken(client, tokenRequest); } protected OAuth2AccessToken getAccessToken (ClientDetails client, TokenRequest tokenRequest) { return tokenServices.createAccessToken(getOAuth2Authentication(client, tokenRequest)); } }
1
2
3
4
5
6
7
8
9
10
11
12
13
14
15
16
17
18
19
20
21
22
23
24
25
26
27
28
29
30
31
32
33
public class DefaultTokenServices implements AuthorizationServerTokenServices , ResourceServerTokenServices,ConsumerTokenServices, InitializingBean { public OAuth2AccessToken createAccessToken (OAuth2Authentication authentication) throws AuthenticationException { OAuth2AccessToken existingAccessToken = tokenStore.getAccessToken(authentication); OAuth2RefreshToken refreshToken = null ; if (refreshToken == null ) { refreshToken = createRefreshToken(authentication); } else if (refreshToken instanceof ExpiringOAuth2RefreshToken) { ExpiringOAuth2RefreshToken expiring = (ExpiringOAuth2RefreshToken) refreshToken; if (System.currentTimeMillis() > expiring.getExpiration().getTime()) { refreshToken = createRefreshToken(authentication); } } OAuth2AccessToken accessToken = createAccessToken(authentication, refreshToken); tokenStore.storeAccessToken(accessToken, authentication); refreshToken = accessToken.getRefreshToken(); if (refreshToken != null ) { tokenStore.storeRefreshToken(refreshToken, authentication); } return accessToken; } }
获取到了之后然后返回执行加载上下文等,就完成了登录了。
2.6. 资源服务器验证 客户端请求资源的时候会携带token到资源服务器,资源服务器拿到token之后到认证服务器认证,单点登录中,资源服务器和认证服务器是同一个。FilterChainProxy#doFilter()OAuth2AuthenticationProcessingFilter#doFilter()OAuth2AuthenticationProcessingFilter就是对客户端认证的过滤器了
接下来我们看此类的源码
1
2
3
4
5
6
7
8
9
10
11
12
13
14
15
16
17
18
19
20
21
22
23
24
25
26
27
28
29
30
31
32
33
public class OAuth2AuthenticationProcessingFilter implements Filter , InitializingBean { public void doFilter (ServletRequest req, ServletResponse res, FilterChain chain) throws IOException, ServletException { final boolean debug = logger.isDebugEnabled(); final HttpServletRequest request = (HttpServletRequest) req; final HttpServletResponse response = (HttpServletResponse) res; try { Authentication authentication = tokenExtractor.extract(request); if (authentication == null ) { } else { Authentication authResult = authenticationManager.authenticate(authentication); eventPublisher.publishAuthenticationSuccess(authResult); SecurityContextHolder.getContext().setAuthentication(authResult); } } catch (OAuth2Exception failed) { } chain.doFilter(request, response); } }
我们再来看认证的逻辑OAuth2AuthenticationManager
1
2
3
4
5
6
7
8
9
10
11
12
13
14
15
16
17
18
19
20
21
public class OAuth2AuthenticationManager implements AuthenticationManager , InitializingBean { public Authentication authenticate (Authentication authentication) throws AuthenticationException { String token = (String) authentication.getPrincipal(); OAuth2Authentication auth = tokenServices.loadAuthentication(token); Collection<String> resourceIds = auth.getOAuth2Request().getResourceIds(); if (resourceId != null && resourceIds != null && !resourceIds.isEmpty() && !resourceIds.contains(resourceId)) { throw new OAuth2AccessDeniedException ("Invalid token does not contain resource id (" + resourceId + ")" ); } checkClientDetails(auth); auth.setAuthenticated(true ); return auth; } }
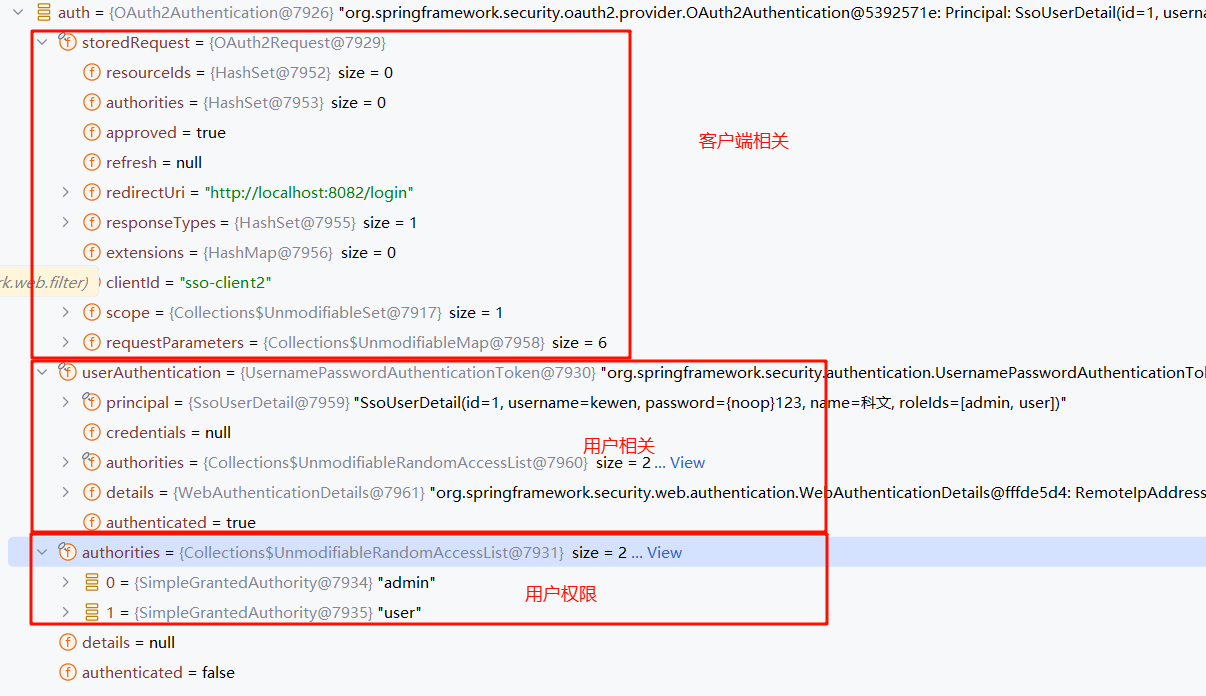
再看OAuth2Authentication auth = tokenServices.loadAuthentication(token);这里,跟踪ResourceServerTokenServices的源码
1
2
3
4
5
6
7
8
9
10
11
12
13
14
15
16
17
18
19
20
21
22
23
24
25
26
27
28
29
public class DefaultTokenServices implements AuthorizationServerTokenServices , ResourceServerTokenServices,ConsumerTokenServices, InitializingBean { public OAuth2Authentication loadAuthentication (String accessTokenValue) throws AuthenticationException,InvalidTokenException { OAuth2AccessToken accessToken = tokenStore.readAccessToken(accessTokenValue); if (accessToken == null ) { throw new InvalidTokenException ("Invalid access token: " + accessTokenValue); } else if (accessToken.isExpired()) { tokenStore.removeAccessToken(accessToken); throw new InvalidTokenException ("Access token expired: " + accessTokenValue); } OAuth2Authentication result = tokenStore.readAuthentication(accessToken); if (clientDetailsService != null ) { String clientId = result.getOAuth2Request().getClientId(); try { clientDetailsService.loadClientByClientId(clientId); } catch (ClientRegistrationException e) { throw new InvalidTokenException ("Client not valid: " + clientId, e); } } return result; } }
认证信息OAuth2Authentication auth = tokenServices.loadAuthentication(token);主要包含用户相关的信息和客户端相关的信息
我们上面得知OAuth2AuthenticationProcessingFilter认证完之后会设置上下文,然后继续走后面的过滤器,那么这里走完再走后面的其它过滤器后就到了应用里面的接口了,由于获取用户资源的接口需要自己定义,并且客户端也是自己配置端点,因此我们只需要保证服务端提供的用户详细信息的接口和客户端配置的获取的接口端点一致就可以了,比如我们配置的/user
1
2
3
4
5
6
7
8
9
@RestController public class UserController { @GetMapping("/user") public Object getCurrentUser (Authentication principal) { Object principal1 = principal.getPrincipal(); return principal; } }
这样访问User之后就返回对应的数据给客户端了。
资源服务器主要就是对于客户端带上token之后和资源服务器(没分开的话则是服务端)认证过程的理解,获取用户信息是普通接口。OAuth2AuthenticationProcessingFilter认证的时候肯定就会组装远程认证用户客户端的链接,这里就暂时不讨论,我们只需要知道这里肯定会有小的变动(如,可能是RemoteTokenServices而不是DefaultTokenServices)。
这样从登录到获取用户就完成了。其实也分了好几次的访问。