1. 问题由来
nacos的属性注入的思路和spirng的属性注入是相似的,因此在分析使用nacos的时候按照spring的对应注解用法使用,其对应关系为:
| nacos |
spring |
@NacosPropertySource |
@PropertySource |
@NacosConfigurationProperties |
@ConfigurationProperties |
@NacosValue |
@Value |
因此按照配置如下配置工程
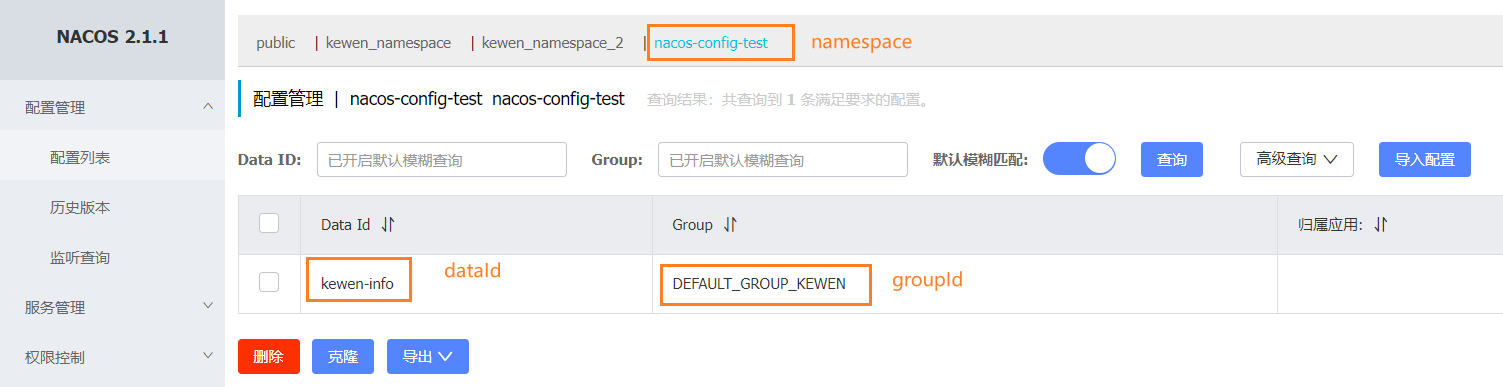
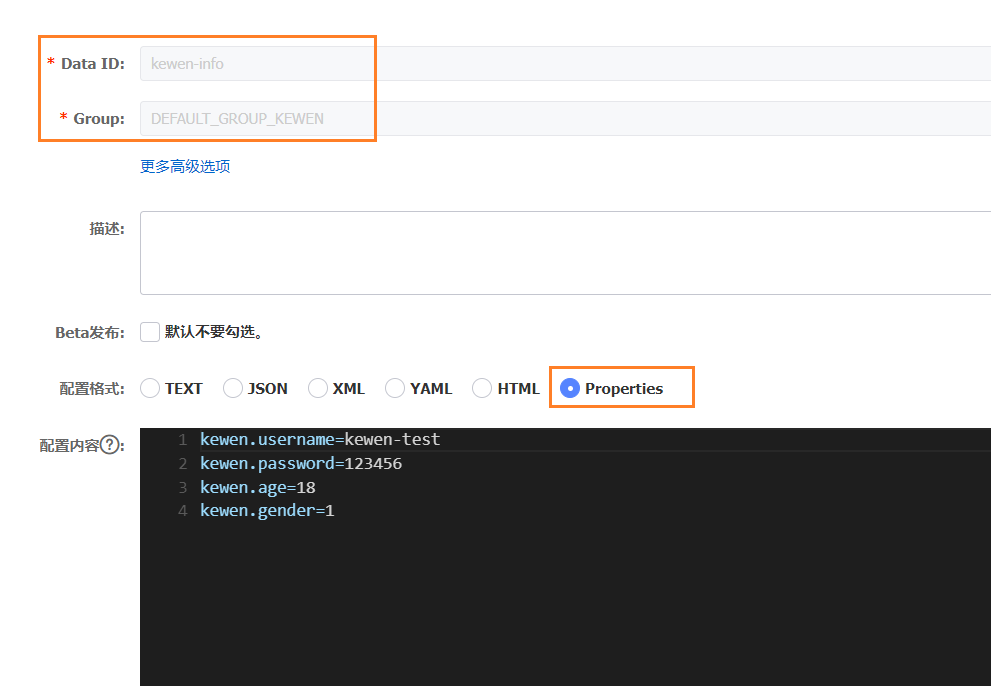
nacos中配置
项目依赖
1
2
3
4
5
| <dependency>
<groupId>com.alibaba.boot</groupId>
<artifactId>nacos-config-spring-boot-starter</artifactId>
<version>0.2.10</version>
</dependency>
|
启动类
1
2
3
4
5
6
7
8
| @SpringBootApplication
@NacosPropertySource(name ="nacos-config-test" ,groupId = "DEFAULT_GROUP_KEWEN",dataId = "kewen-info",autoRefreshed = true)
public class NacosSampleConfigApp {
public static void main(String[] args) {
SpringApplication.run(NacosSampleConfigApp.class,args);
}
}
|
项目中使用
1
2
3
4
5
6
7
8
9
10
11
| `@Configuration
@NacosConfigurationProperties(prefix = "kewen",dataId = "kewen-info",groupId = "DEFAULT_GROUP_KEWEN",
type = ConfigType.PROPERTIES)
@Data
public class TestConfigProperties {
private String username;
private String password;
private Integer age;
private Integer gender;
}
|
这样配置好了,却出现一个问题,TestConfigProperties中无法获取到配置信息,甚是疑惑,不应该啊,按照spring的配置方法,是可以用的了呀,为什么同比替换之后就不行了呢。
之后,又改造i项目,在TestConfigProperties类上加上@ConfigurationProperties是可以使用的,但是这样的话使用@NacosConfigurationProperties就没有意义了。
带着这个问题,开始了找寻答案。
经过在网上搜寻,没有发现问题的原有,只有springcloud对于NacosConfigurationProperties不支持的一说。
可是问题还是没解决,因此决心看一下这配置是怎么注入到对象中的。
2. 源码分析
根据上面搭建的工程,开始debug源码
考虑到肯定注入是从注解开始的,因此定位注解@NacosConfigurationProperties可能在注入配置属性的地方,最终定位到类NacosConfigurationPropertiesBindingPostProcessor,
其类的结构如下:
1
2
3
4
5
6
7
8
9
10
11
12
13
14
15
16
17
18
19
20
21
22
23
24
25
26
27
28
29
30
31
32
33
34
35
| public class NacosConfigurationPropertiesBindingPostProcessor
implements BeanPostProcessor, ApplicationContextAware {
public static final String BEAN_NAME = "nacosConfigurationPropertiesBindingPostProcessor";
private Properties globalNacosProperties;
private NacosServiceFactory nacosServiceFactory;
private Environment environment;
private ApplicationEventPublisher applicationEventPublisher;
private ConfigurableApplicationContext applicationContext;
@Override
public Object postProcessBeforeInitialization(Object bean, String beanName)
throws BeansException {
}
private void bind(Object bean, String beanName,
NacosConfigurationProperties nacosConfigurationProperties) {
}
@Override
public Object postProcessAfterInitialization(Object bean, String beanName)
throws BeansException {
return bean;
}
@Override
public void setApplicationContext(ApplicationContext applicationContext)
throws BeansException {
this.applicationContext = (ConfigurableApplicationContext) applicationContext;
}
}
|
此类实现了BeanPostProcessor,那么这就好说了,我们知道spring的bean的初始化阶段会调用实现了接口BeanPostProcessor的所有的bean(这是一个生命周期扩展函数,spring很多扩展都基于此的),因此TestConfigProperties初始化的时候一定会经过这里,执行postProcessBeforeInitialization方法
接下来我们再看postProcessBeforeInitialization()方法
1
2
3
4
5
6
7
8
9
10
11
12
13
14
15
16
17
18
19
20
21
22
23
24
25
26
27
28
29
30
31
32
33
34
35
36
37
38
| public class NacosConfigurationPropertiesBindingPostProcessor{
public Object postProcessBeforeInitialization(Object bean, String beanName)
throws BeansException {
NacosConfigurationProperties nacosConfigurationProperties = findAnnotation(
bean.getClass(), NacosConfigurationProperties.class);
if (nacosConfigurationProperties != null) {
bind(bean, beanName, nacosConfigurationProperties);
}
return bean;
}
private void bind(Object bean, String beanName,
NacosConfigurationProperties nacosConfigurationProperties) {
NacosConfigurationPropertiesBinder binder;
try {
binder = applicationContext.getBean(
NacosConfigurationPropertiesBinder.BEAN_NAME,
NacosConfigurationPropertiesBinder.class);
if (binder == null) {
binder = new NacosConfigurationPropertiesBinder(applicationContext);
}
}
catch (Exception e) {
binder = new NacosConfigurationPropertiesBinder(applicationContext);
}
binder.bind(bean, beanName, nacosConfigurationProperties);
}
}
|
<1> 此处调用AnnotationUtils.findAnnotation()就直接获取到了类注解对应的值,其内部实现不用关注,是spring统一的封装方法
<2> 到了绑定方法,我们先看一下debug信息
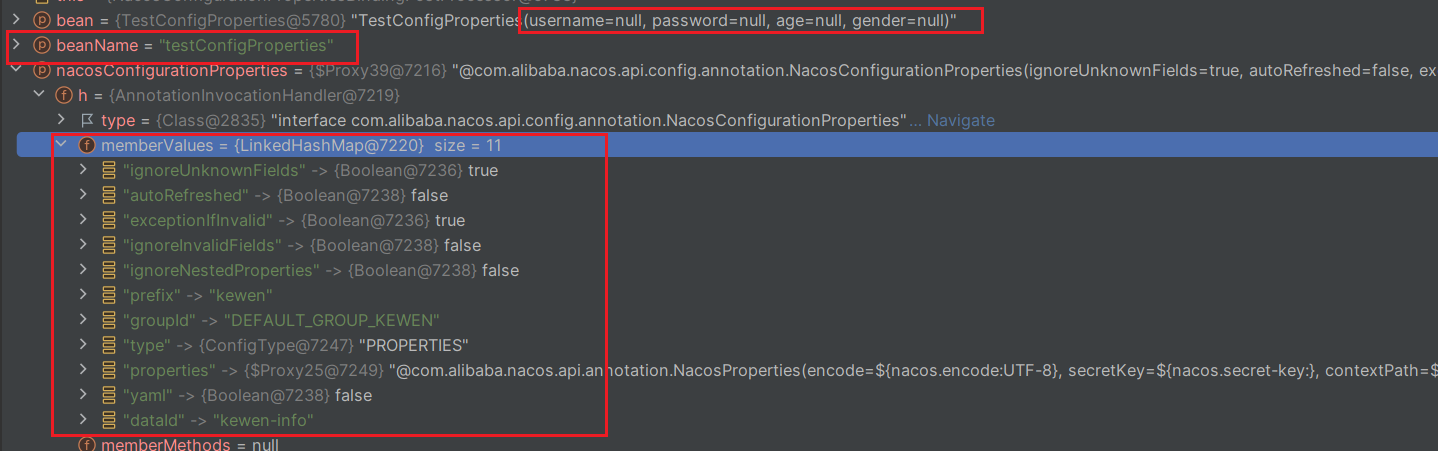
正好我们需要的都在,包括bean、beanName、NacosConfigurationProperties,NacosConfigurationProperties是一个代理类,但是我们不关注这个。
那么后面继续执行
到了binder.bind()方法了,此时我们也根据对象的信息能猜出来,这直接是将注解值和对象绑定起来了,我们继续分析binder.bind()
对于NacosConfigurationPropertiesBinder,我们直接分析bind方法
1
2
3
4
5
6
7
8
9
10
11
12
13
14
15
16
17
18
19
20
21
22
23
24
25
26
27
28
29
30
31
32
33
34
35
36
37
38
39
40
41
42
43
44
45
46
47
48
49
50
51
52
53
54
55
56
57
58
59
60
61
| public class NacosConfigurationPropertiesBinder{
protected void bind(final Object bean, final String beanName,
final NacosConfigurationProperties properties) {
final String dataId = NacosUtils.readFromEnvironment(properties.dataId(),
environment);
final String groupId = NacosUtils.readFromEnvironment(properties.groupId(),
environment);
final String type;
ConfigType typeEunm = properties.yaml() ? ConfigType.YAML : properties.type();
if (ConfigType.UNSET.equals(typeEunm)) {
type = NacosUtils.readFileExtension(dataId);
}
else {
type = typeEunm.getType();
}
final ConfigService configService = configServiceBeanBuilder
.build(properties.properties());
if (properties.autoRefreshed()) {
String content = getContent(configService, dataId, groupId);
if (hasText(content)) {
doBind(bean, beanName, dataId, groupId, type, properties, content,
configService);
}
Listener listener = new AbstractListener() {
@Override
public void receiveConfigInfo(String config) {
doBind(bean, beanName, dataId, groupId, type, properties, config,
configService);
}
};
try {
if (configService instanceof EventPublishingConfigService) {
((EventPublishingConfigService) configService).addListener(dataId,
groupId, type, listener);
}
else {
configService.addListener(dataId, groupId, listener);
}
}
catch (NacosException e) {
if (logger.isErrorEnabled()) {
logger.error(e.getMessage(), e);
}
}
}
}
}
|
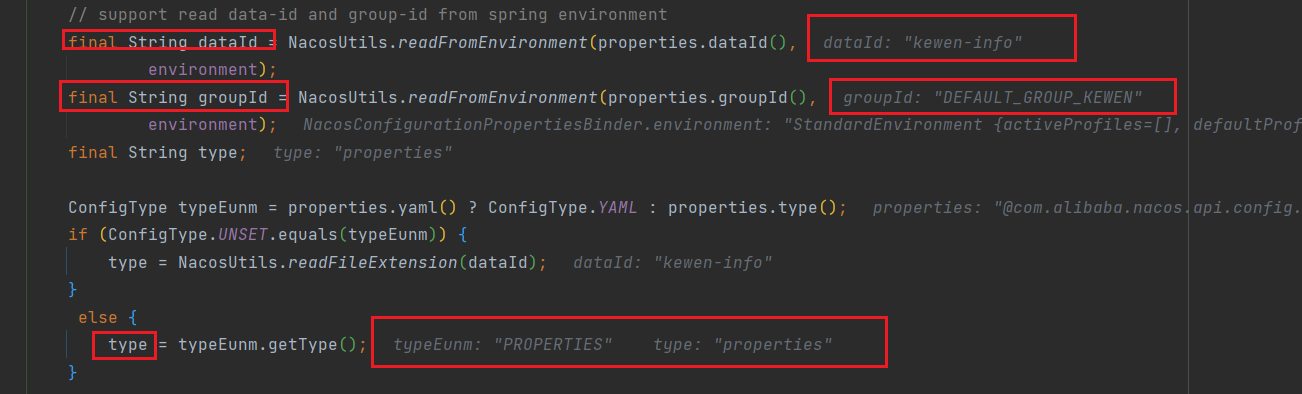
<1> 我们看获取到的属性
**<2>**我们再看configservice
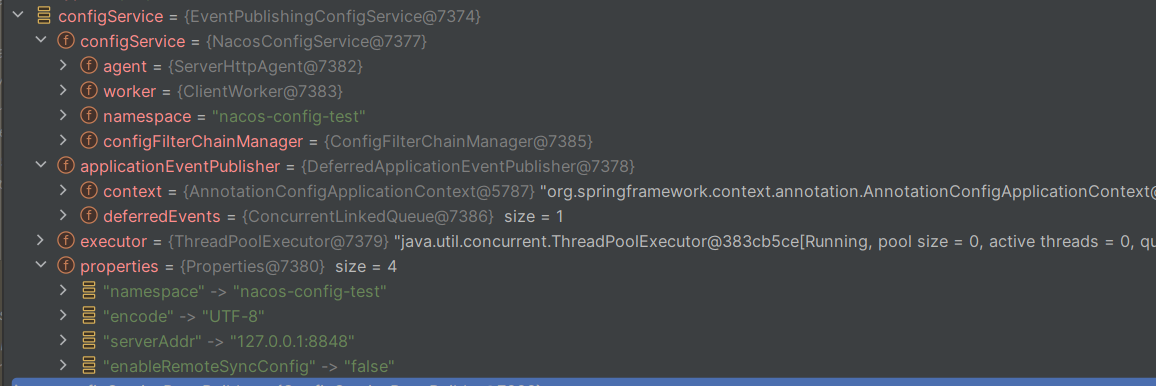
图中,我们看到其内部就是nacos-server的相关信息,就是拿这个去访问nacos的
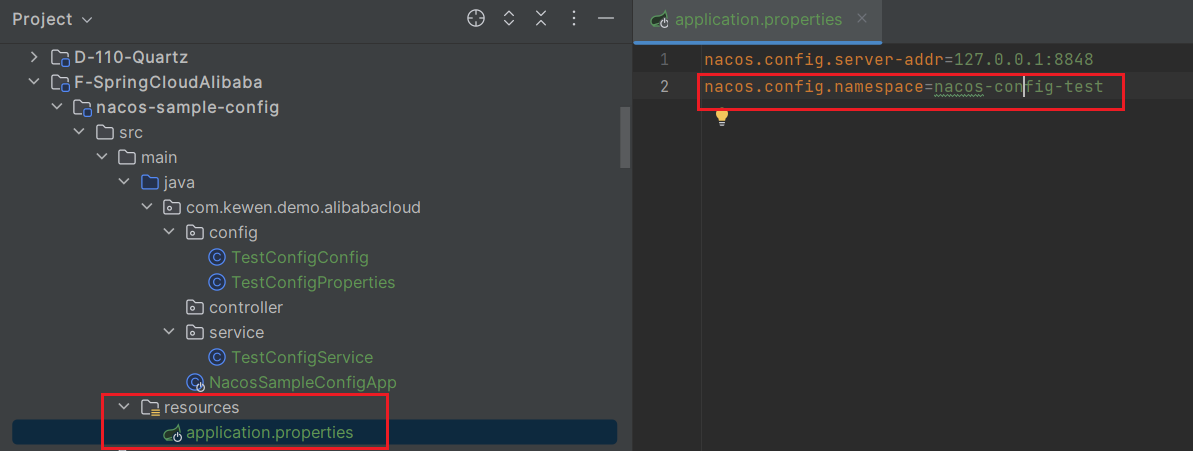
值得注意的是 namespace,这就是应用配置文件配置的namespace,加上它就有namespace + dataId + groupId 准确定位到具体配置
我们修改配置,加上autoRefreshed = true再试
1
2
3
4
5
6
7
8
9
10
11
| @Component
@NacosConfigurationProperties(prefix = "kewen",dataId = "kewen-info",groupId = "DEFAULT_GROUP_KEWEN",
type = ConfigType.PROPERTIES,autoRefreshed = true)
@Data
public class TestConfigProperties {
private String username;
private String password;
private Integer age;
private Integer gender;
}
|
<3> 断点定位到此,debug信息如下
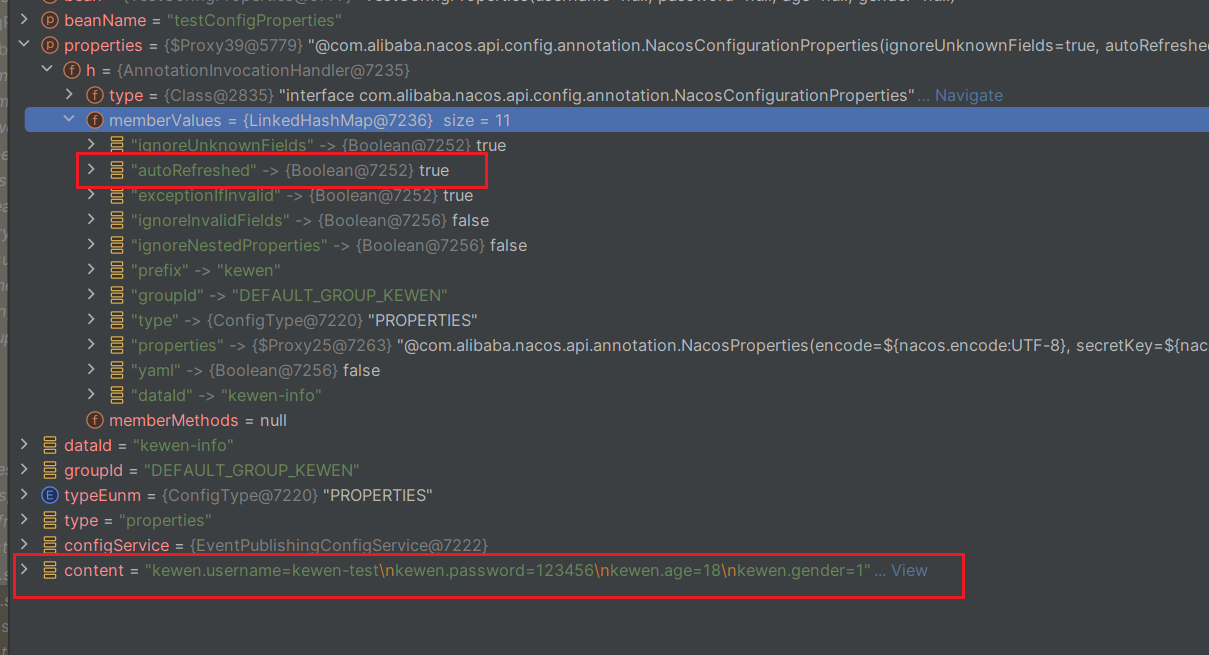
此时,也拿到了nacos配置的信息content
再后面就是doBind()就不用继续看了,内容就是绑定到一起
最后添加监听器,当有变化时监听器能拿到变化修改对象
3. 总结
还得看源码