
5-SpringCloudAlibaba引入openfeign
1. 序言
前面已经成功调用了生产者消费者,但消费者是通过RestTemplate调用的,而spring-cloud中有原生的openfeign方案,更为符合微服务特性
因此改RestTemplate为OpenFeign调用,同时加入Hystrix做熔断
2. OpenFeign
工程沿用消费者工程,需要引入openfeign和改造调用接口
2.1. openfeign的引入
添加依赖
1
2
3
4
5
6
7
8
9
10
11
12
13
14
15
16
17
18
19
20
21
22
23<dependencies>
<!--
<dependency>
<groupId>com.alibaba.cloud</groupId>
<artifactId>spring-cloud-starter-alibaba-nacos-config</artifactId>
</dependency>
<dependency>
<groupId>com.alibaba.cloud</groupId>
<artifactId>spring-cloud-starter-alibaba-nacos-discovery</artifactId>
</dependency>
-->
<!--需要引入org.springframework.cloud的openfeign,记住是openfeign,feign已经没有维护了-->
<dependency>
<groupId>org.springframework.cloud</groupId>
<artifactId>spring-cloud-starter-openfeign</artifactId>
</dependency>
<!--
<dependency>
<groupId>org.springframework.boot</groupId>
<artifactId>spring-boot-starter-web</artifactId>
</dependency>
-->
</dependencies>启动类添加注解
@EnableFeignClients1
2
3
4
5
6
7
public class CloudAlibabaConsumerFeignApp {
public static void main(String[] args) {
ConfigurableApplicationContext run = SpringApplication.run(CloudAlibabaConsumerFeignApp.class, args);
}
}新建FeignClient
1
2
3
4
5
6
7
8
public interface HelloFeign {
public Object hello();
}调用的地方修改
1
2
3
4
5
6
7
8
9
10
11
12
13
14
15
16
17
18
19
20
21
22
23
24
25
26
public class HelloController {
/* 改造原来的调用,去掉 RestTemplate 的配置
@Autowired
RestTemplate restTemplate;
@GetMapping("/hello")
public Object hello(){
ResponseEntity<Object> response = restTemplate.exchange(
"http://cloud-provider/hello",
HttpMethod.GET,
null,
Object.class,
(Object) null)
;
return response.getBody();
}*/
HelloFeign helloFeign;
public Object helloOpenFeign(){
return helloFeign.hello();
}
}
引入openfign了就可以按照微服务推荐的调用了
3. FeignClient解析
FeignClient中有许多参数,最重要的就是 name 和 path 两个参数,分别表示微服务的名称和应用请求的路径
1 |
|
value、name、serviceId 微服务应用名,serviceId已弃用
contextId Feign实例化在容器中的beanId,与远程调用无关
默认可以不填,当有两个name属性相同的FeignClient时,就会报错,因为spring默认把name作为beanId存储,解决办法就是指定不同的contextId
因为一个服务中肯定有很多不同的Controller接口,我们也不能把这个服务所有的调用接口全部写在一个Feign中,因此加入contextId是很有必要的,目的是将各服务分类,方便维护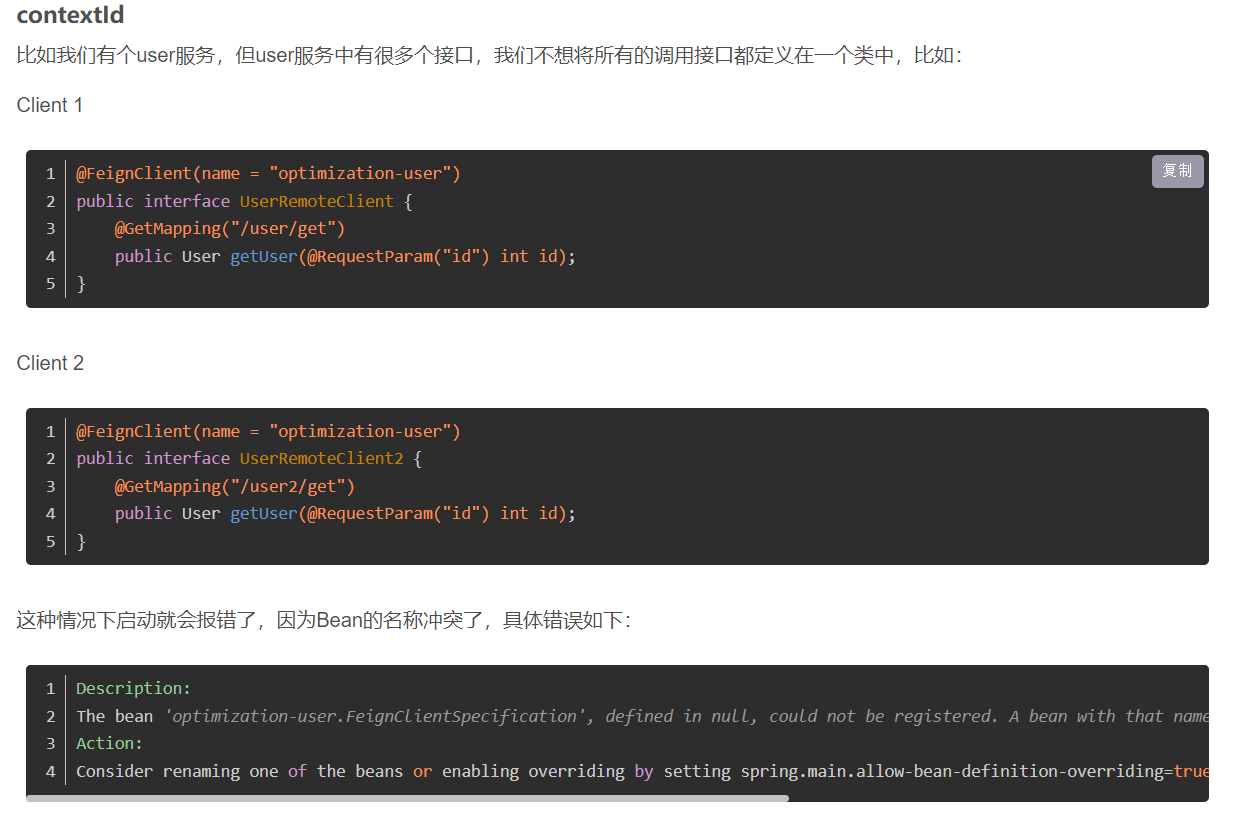
path:
路径,简单的说就是等同于@Controller上配置的@RequestMapping,表示下面所有方法的请求都会拼接上pathfallback: 服务降级回调类,需要配合hytrix使用
fallbackFactory: 服务降级回调类,包含异常信息,需要配合hytrix使用,具体在hytrix讲解
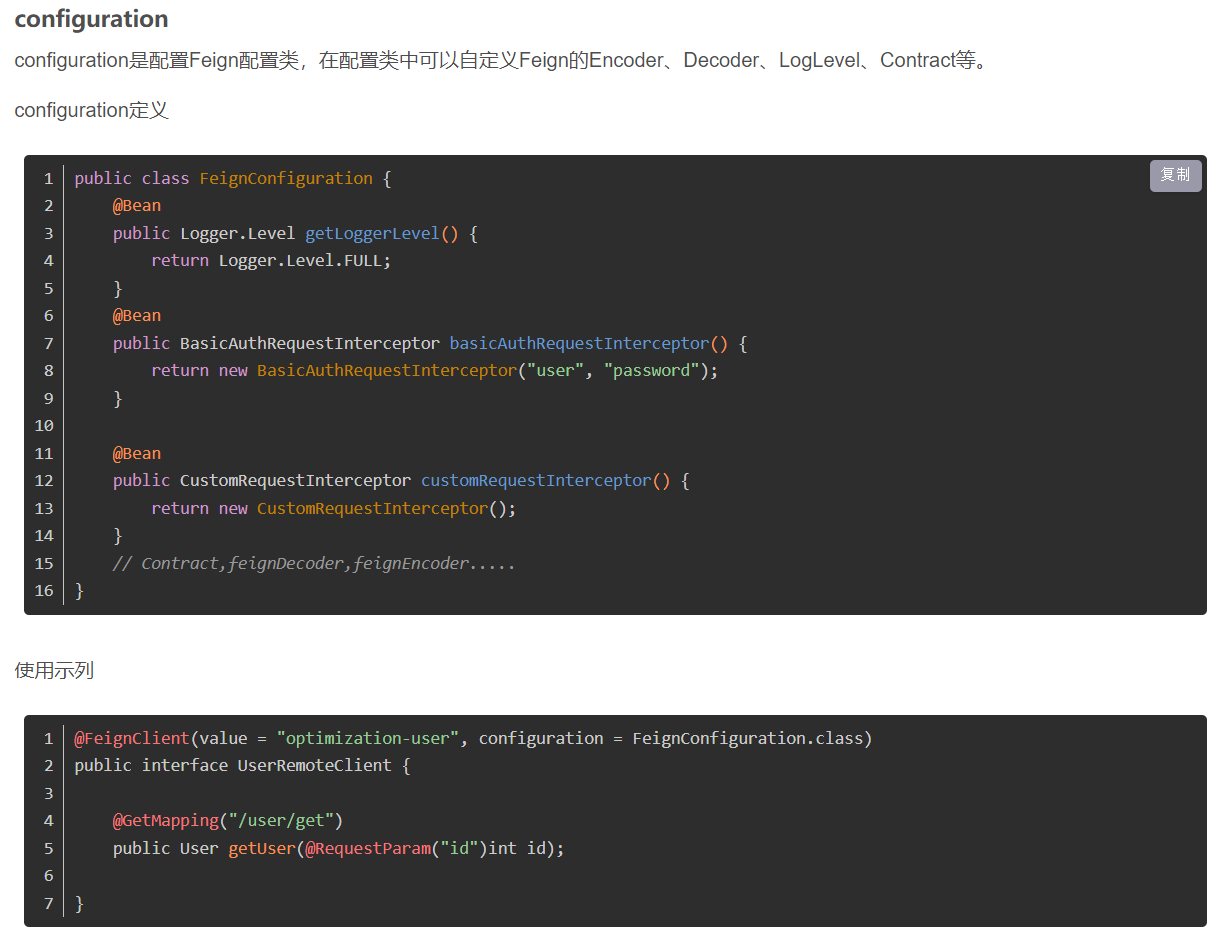
configuration: 配置类,加自定义配置,
primary: 是否把类设为主要的,不常用
url: 使用具体的url,直接指定url调用,不经过注册发现,相当于直接的普通外呼请求了。主要用于开发阶段的测试
qualifier: 注入的名字,不常用
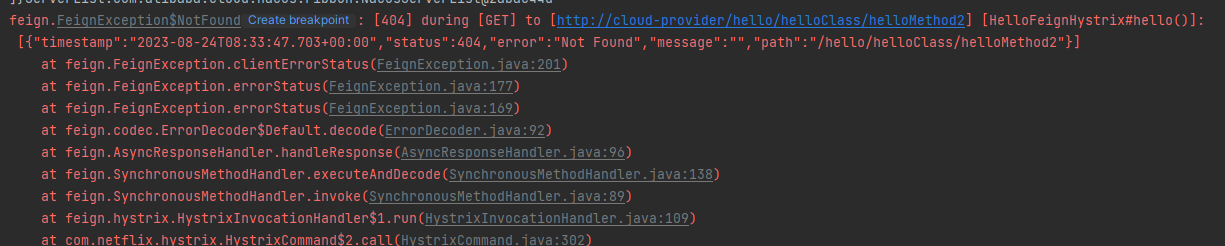
decode404: 是否进行404解码,默认为false抛异常
true 解码的情况,默认返回404异常数据,且不会走异常
false 默认,会报异常
稍微完善的feign如下:
1 |
|
fallback 和 fallbackFactory 见hystrix
4. Feign扩展
4.1. 拦截器实现
feign可以实现拦截器功能,在请求发出之前做一些额外的配置,如在请求头中增加参数,打印请求等
1 |
|
实现RequestInterceptor即可,在请求发送之前会调用,RequestTemplate 包含了请求的基本信息和头,注意此类应该在spring容器中